


Basketball Hoop Drawing: Easy Step-by-Step Guide. Learn To draw a basketball hoop easily with our stepbystep guide! Perfect for beginners. This fun tutorial makes sketching simple & enjoyable.
What is Basketball Hoop Drawing: Easy Step-by-Step Guide & how does it work?
Basketball hoop drawing involves creating a visual representation. Artists sketch hoops for various purposes. This process enhances understanding of basketball fundamentals. Lines. Shapes, & proportions play crucial roles. Accurate dimensions make a drawing functional & pleasing.
Brief history of Basketball Hoop Drawing: Easy Step-by-Step Guide
Basketball equipment has evolved considerably. Early designs lacked standardization. Drawings helped clarify requirements of hoops. Over years. Styles have changed drastically. Modern illustrations reflect advanced techniques & aesthetics.
How To implement Basketball Hoop Drawing: Easy Step-by-Step Guide effectively
Begin with basic shapes like circles & rectangles. Use light pencil strokes for accuracy. Gradually refine lines for clarity. Focus on hoop height & backboard size. Correct proportions ensure realistic representations.
Key benefits of using Basketball Hoop Drawing: Easy Step-by-Step Guide
This drawing technique fosters creativity & skill development. Artists learn fundamental geometric principles. Additionally. Clear communication of ideas occurs. Visual representations simplify complex concepts. Enhanced visual literacy promotes better understanding.
Challenges with Basketball Hoop Drawing: Easy Step-by-Step Guide & potential solutions
One challenge often includes maintaining accurate proportions. Practicing consistently can overcome this issue. Another problem involves perspective in 3D drawings. Utilizing reference images aids in resolving perspective disparities.
Future of Basketball Hoop Drawing: Easy Step-by-Step Guide
Technological integration may shape future drawings. Digital tools could enhance precision & creativity. Collaboration between artists & designers may become common. A rise in online sharing platforms allows for broader visibility.
Table of Basketball Hoop Drawing: Easy Step-by-Step Guide
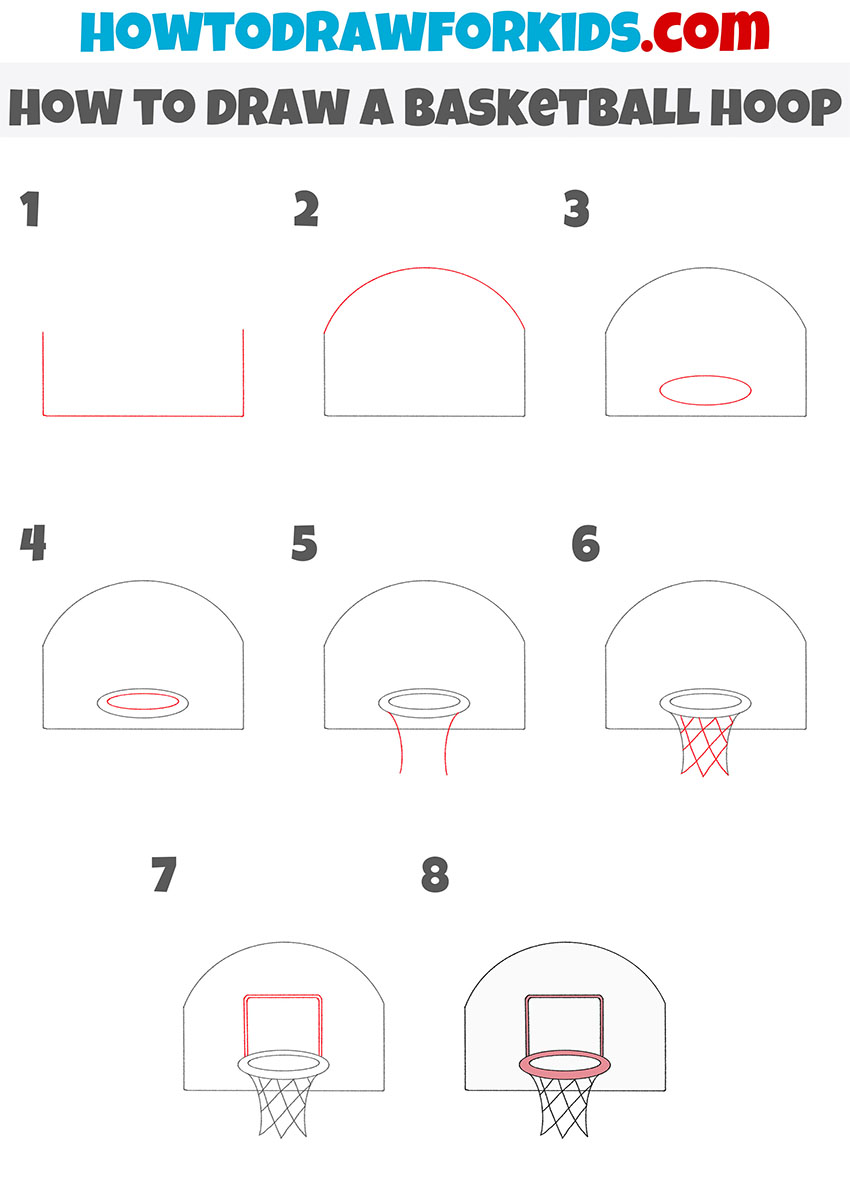
| Step | Description |
|---|---|
| 1 | Sketch basic shapes lightly. |
| 2 | Refine lines for clarity. |
| 3 | Ensure proper proportions. |
| 4 | Focus on perspective accuracy. |
| 5 | Add details & final touches. |

Understanding Basketball Hoop Components
Each basketball hoop consists of several parts. These elements include a backboard. Rim. Net, & pole. Understanding each component enhances overall drawing accuracy. A traditional basketball hoop features a circular rim supported by a rectangular backboard. Various designs exist. Highlighting different styles & preferences.
Drawing these components requires attention. Start with basic shapes. Then refine details. For more insights. Visit this link for additional guidance. This resource provides stepbystep visuals. Following these visuals aids beginners in grasping proportions & placements effectively.
Daily basketball practice enhanced my understanding of this sport. Experience captured attention. Ensuring accurate sketches of hoops. Observing games inspired creativity during drawing sessions. Accurate representation showcases personal artistic interpretations of beloved activities.
Gathering Necessary Materials
Before diving into drawing. Gathering essential materials simplifies The process. Necessary tools include a pencil. Eraser. Paper, & ruler. A set of colored pencils or markers can add vibrancy. Consider also utilizing a compass for precise round shapes.
Explore artistic supplies available online & locally. Investing in quality materials enhances finished artwork. Beginners may start with basic. Affordable supplies. As skills progress. Upgrading tools becomes beneficial for refined details.
Every artist finds personal preferences in their materials. Some favor traditional pencils. While others may prefer pens. Experimenting with different tools fosters creativity & unique styles.
Choosing an Ideal Reference
A good reference image acts as a pivotal guide during drawing. Look for highresolution images that capture hoops from various angles. Selecting clear references allows focus on specifics. Such as proportions & details.
Websites offer excellent sources for reference images. Seek images that showcase different basketball hoop styles & contexts. Consider including both outdoor & indoor setups for variety.
Utilizing multiple references aids in developing diverse techniques. Observations from sports games provide reallife inspirations. Contributing To natural & fluid sketches. Drawing from various styles adds uniqueness & personalization.
Sketching Basic Shapes
Start sketches with fundamental shapes. Draw a rectangle for The backboard & a circle for The rim. Using light pencil strokes ensures easy adjustments. Keep initial outlines loose for flexibility.
Balancing proportions becomes crucial at this stage. Each component must harmoniously relate To one another. Adjust The sizes of The shapes accordingly To achieve symmetry. A ruler may assist in maintaining straight lines.
Practicing these basic shapes enhances overall drawing comfort. Regular exercises build muscle memory. Familiarity with shapes fosters greater confidence during detailed rendering.
Refining The Backboard Details
Once basic shapes are established. Focus on detailing The backboard. Add depth by sketching wood grain or paint texture. Draw mounting brackets & any visible screws for realism.
Considering light & shadow effects enriches realism within your drawing. Identifying sources of light allows for shadows’ accurate depiction. Use shading techniques To define edges & create depth.
Experimenting with different styles of backboards can inspire creativity. Go for traditional wooden styles or modern clear acrylic designs. Each variation presents newfound artistic challenges.
Drawing The Basket Rim
Now. Focus attention on drawing The rim. Begin with The circular outline. Ensuring both symmetry & The correct size. Rims typically extend slightly from The backboard. Accurate representation illustrates realism in your artwork.
Next. Sketch netting around The rim. A net consists of woven strands that add another layer of detail. Using wavy lines can mimic a realistic appearance as shadows will enhance its visual texture.
Perhaps incorporating different rim designs simplifies experimentation. Some rims have unique qualities. While others feature classic designs. Each perspective brings its artistic essence To life.
Enhancing The Net
The net adds dynamic quality To basketball hoop drawings. Use light lines To depict woven strands of material. Ensure that netting appears flowy & natural. Not stiff.
Focus on how The net interacts with The rim. During game scenarios. Motion must be represented by The net’s sway. Illustrate a sense of action by playing with The net’s angles.
Understanding netting techniques involves studying various sportsmanship images. Draw various nets showcasing different styles adds creativity without overwhelming simplicity.
Adding Depth & Shadows
Shading distinguishes your drawing’s elements. Determine light sources within your scene. Shadows beneath The rim & along The backboard add depth & dimension.
Create gradients using techniques like crosshatching or blending. These methods develop textures within your artwork that enhance visual appeal. Subtlety plays a significant role in shading. So practice is vital.
Reviewing completed sketches against reference images can boost accuracy. Adjust shadows for improved realism. Ensuring each element looks cohesive within The scene. This evaluation process enhances overall satisfaction.
Incorporating Background Elements
Enhancing your drawing’s context through background elements elevates overall aesthetics. Consider adding features like a basketball court. Crowd. Or park setting. Backgrounds enhance storytelling within artwork.
Sketching elements like trees or stadiums frames your basketball hoop. Utilize softer lines or lighter shading for distant elements. Ensuring focus remains on The hoop. This technique creates a threedimensional appearance.
Research various court styles for inspiration. Different environments affect how a hoop appears. By adapting backgrounds. You expand The diversity of your artistic portfolio effectively.
Final Touches & Refinements
Before finalizing. Step back & review your drawing. Look for areas needing refinement or enhancement. Erase any unwanted lines To clean up sketches. Ensuring clarity remains.
Consider adding colors or additional details. Bright colors can energize The piece. Making it stand out. Use shading techniques To enhance depth or realism within your drawing.
Sometimes finishing touches may define a piece’s quality. Don’t rush through this process; allow creativity room for expression. Each adjustment contributes toward achieving completed artwork seamlessly.
Exploring Different Styles
Diving into various styles enhances your portfolio. Artistic expression varies across simple sketches versus elaborate designs. Experiment with cartoonish styles juxtaposed against realistic portrayals.
Digital art offers new avenues for creativity. Utilize software designed for artists. Allowing for endless possibilities. Transitioning between digital & traditional art provides fresh perspectives on existing techniques.
Explore various cultures for inspiration. Different traditions may inspire unique basketball hoop designs. Cataloging ideas encourages innovative approaches toward familiar subjects.
Practicing Regularly
Commitment toward regular practice builds significant drawing skills over time. Set daily or weekly drawing goals. Allocating time specifically for recreation. This may involve quick sketches or detailed renderings over minutes or hours.
Challenge yourself with various subjects & drawing formats. Attempting different scenes enriches flexibility in artistic abilities. Incorporating varied media can boost creativity while keeping things fresh.
Engaging with other artists provide support & inspiration. Join online forums or local art groups where individuals share work. This collaborative spirit cultivates personal growth & talent recognition.
Sharing Your Work
Once satisfied. Share artwork with friends. Family. Or online communities. Receiving constructive feedback helps improve skills & boosts confidence. Aim for platforms dedicated To artists for greater exposure.
Documenting progress captures personal evolution as an artist. Consider maintaining a sketchbook detailing each piece. This serves as motivation. Allowing reflection upon past challenges & successes.
Throughout sharing experiences. Remain open To learning. Each interaction provides unique insights that can enrich your process further. By sharing. Inspire others To pursue their creative journeys.
Benefits of Art in Everyday Life
Engaging in art fosters personal wellbeing & growth. Artistic expression serves as a therapeutic outlet. Relieving stress & anxiety. Moreover. Creating encourages mindfulness. Enhancing overall focus & concentration.
Participatory experiences enrich one’s life. Contributing positively. Attending workshops expands both skills & networks. Engaging with diverse communities fosters friendships based on shared interests.
Art cultivates deeper appreciation for creativity in everyday experiences. Observing surroundings may spark inspiration within mundane activities. This heightened awareness allows individuals greater enjoyment of life’s subtle nuances.
Basketball Hoop Drawing Features
- 🎨 Stepbystep guidance
- 🖍️ Various styles options
- 📐 Useful materials list
- ✨ Enhance creativity through practice
- 📸 Reference image recommendations
- 🖼️ Encourage sharing & feedback
- 🌈 Explore unique artistic expressions
Resources for Learning More
As one develops skills. Plenty of resources can further enhance artistic journey. Explore various books focusing on drawing techniques or online courses emphasizing art strategies. Specific platforms offer communitydriven learning experiences.
Additionally. Numerous websites cater specifically towards continual growth in drawing. For specific guidance on basketball hoop drawing. Check out this resource that provides detailed instructions & tips.
Continuous exploration keeps motivation alive. Engage with platforms offering curated content tailored towards artists at all levels. Seek out inspiration regularly through emerging trends within art communities.
Understanding Basketball Hoop Structure
A basketball hoop consists of several crucial components. These elements include a backboard. Rim. Net, & pole. Understanding each part aids in creating accurate drawings.
The backboard serves as a surface for rebounds. It helps players direct The ball into The hoop. Next. The rim holds The net & provides a target for shots.
Each component contributes To overall design. Familiarizing oneself with these parts enhances drawing skills. Practicing each element improves accuracy during drawing sessions.
Gathering Necessary Materials
Before starting. Gather essential drawing materials. Pencils. Erasers. Rulers, & paper should be on hand. Consider having colored pencils or markers for detailing.
Using a ruler helps maintain straight lines. Each measurement needs precision for accurate representation. Incorporating different techniques can enhance overall quality.
Look for inspiration online. Platforms like Pinterest offer various drawing styles. Analyze drawings from other artists for additional ideas.
Choosing Right Perspective
Selecting a perspective is vital for your drawing. Options include front view. Side view. Or angled view. Each perspective highlights different aspects of The hoop.
Front view focuses on The hoop & net. Side view showcases backboard dimensions. An angled view adds a dynamic look. Making a drawing interesting.
Experiment with various perspectives before starting. Sketching basic shapes helps visualize threedimensional structures. Practicing angles improves overall understanding of depth.
Starting with Basic Shapes
Begin your drawing using simple shapes. Draw a square or rectangle for The backboard. Next. Add a circle for The rim.
Sketch The pole supporting The hoop underneath. A vertical line can represent this pole. Ensure proportions feel right & adjust as necessary.
Basic shapes act as guidelines. Later. Refine these shapes into detailed components. Practice frequently enhances your ability over time.
Adding Details To Your Drawing
Once basic shapes are in place. Adding details becomes essential. Start with backboard lines. Ensuring alignment & symmetry. Adding depth enhances its visual interest.
Next. Draw The rim & net. Create curves for The rim. Ensure The net appears To flow naturally. You can even add small knots at each connection point.
For further guidance. Visit Easy Drawing Guides. They offer stepbystep instructions. Following expert advice helps improve your technique.
Refining Your Artwork
After detailing. Refining artwork is vital. Look closely for any inconsistencies. Use an eraser for any mistakes or unwanted marks.
Enhance shading To add depth. Determine where light hits & where shadows fall. This adds a realistic touch. Making your drawing pop.
Experience plays a crucial role in this step. I recall my early attempts. Filled with uncertainty. Gradually. Confidence grew as techniques improved.
Coloring Your Basketball Hoop Drawing
Color adds vibrancy. Transforming a simple drawing into a captivating work. Choosing a color palette is crucial. Research color combinations or go with traditional team colors.
Start with The backboard. Often white or clear. The rim usually appears in shades of orange or metallic tones. Use colored pencils or markers for vivid outcomes.
Experiment with layering colors. Blend lighter shades with darker tones for depth. This technique enhances overall realism in your drawing.
Final Touches & Presentation
After coloring. Reflect on final touches. Assess how elements work together. Make any lastminute adjustments for consistency & unity.
Consider framing your artwork. A great presentation adds value & showcases your effort. Displaying in a prominent place highlights your achievements.
To see how others display their artwork. Visit History All Sports. You might find inspiration for your own presentations.
Basketball Hoop Drawing Comparison Table
| Aspect | Simple Drawing 🎨 | Detailed Drawing 🖌️ |
|---|---|---|
| Time Required | Less time ⏳ | More time ⏲️ |
| Skill Level | Beginnerfriendly 🌱 | Advanced techniques 🌟 |
| Use of Colors | Limited colors 🎨 | Vibrant colors 🌈 |
| Artistic Value | Simple aesthetic 🖼️ | High artistic value 🎖️ |
What materials do I need To draw a basketball hoop?
To draw a basketball hoop. You will need paper. A pencil. An eraser. A ruler, & colored markers or pencils for coloring.
How do I start The drawing of The basketball hoop?
Begin by sketching a simple rectangle for The backboard at The top of your paper. Make sure To keep The dimensions proportional.
What is The next step after drawing The backboard?
After The backboard. Draw a circle To represent The hoop itself. The hoop should be centered below The backboard & drawn with a compass or freehand if you prefer.
How do I make The net for The basketball hoop?
To create The net. Draw a series of curved lines from The hoop downwards. Ensure these lines intersect in a way that mimics a net’s mesh pattern.
Can I add details To The backboard?
Yes. You can add details like a shooting target. Team logos. Or lines To make it look more realistic. Use your pencil To sketch these details lightly.
What colors should I use for The basketball hoop?
You can use any colors you like. Common choices are orange for The hoop. White for The net, & any color that suits your design for The backboard.
How do I shade The basketball hoop?
To add shading. Choose a slightly darker color than The base color for The hoop & backboard. Apply it on one side To create a threedimensional effect.
What should I do if I make a mistake while drawing?
If you make a mistake. Simply use an eraser To correct it. Lightly sketch your shapes first so that it’s easier To erase without damaging your paper.
How can I make my drawing more realistic?
Focus on proportions. Add shadows, & use varying line thicknesses. Observing real basketball hoops can also help in capturing details accurately.
Is it necessary To draw a court as well?
No. It is not necessary. But adding a court can provide context & enhance The overall look of your basketball hoop drawing.
What can I do after I finish drawing?
You can frame your artwork. Share it with friends online. Or use it as a design for a basketballrelated project.
How long does it take To draw a basketball hoop?
The time it takes To draw a basketball hoop will vary based on your skill level. But it typically takes around 30 minutes To an hour for a detailed drawing.
Can I use digital tools To draw The basketball hoop?
Yes. Digital drawing tools can be excellent for creating clean. Precise lines & easily modifying your drawing compared To traditional methods.
Where can I find inspiration for my basketball hoop drawing?
You can find inspiration in basketballrelated artwork. Sports magazines. Online galleries. Or even by observing real basketball hoops in parks & courts.
What age group is this drawing tutorial suitable for?
This drawing tutorial is suitable for all age groups. From young children learning To sketch To adults looking To develop their drawing skills.
Conclusion
In conclusion, drawing a basketball hoop can be a fun & creative experience! By following this easy step-by-step guide, you can create your own hoop with just a few simple lines & shapes. Remember, practice makes perfect, so don’t be afraid To try again if your first attempt isn’t exactly what you wanted. Whether you’re adding it To your art project or just doodling, enjoy The process & let your imagination flow. So grab your pencil & paper, & have fun with your basketball hoop drawing! Happy sketching!