

Easy Basketball Drawing: Step-by-Step for Beginners. Discover how To draw a basketball with our easy. Stepbystep guide for beginners! Grab your pencils & start creating fun basketball art today!
What is Easy Basketball Drawing: Step-by-Step for Beginners?
This concept simplifies basketball drawing. Simple techniques help portray movement. Artists can capture players. Objects, & action. Use basic shapes for effective visuals. Sketching forms helps create life-like representations. Step-by-step guides offer clear instructions. Over time. Artistic skills improve greatly.
Brief history of Easy Basketball Drawing: Step-by-Step for Beginners
Basketball art evolved alongside game popularity. Artists sought new ways for expression. Early sketches used dynamic forms & lines. Techniques became refined through practice & observation. Over decades. Basketball culture influenced artistic styles. Today. Modern methods blend traditional skills & digital tools. Communities foster sharing & learning.
How To implement Easy Basketball Drawing: Step-by-Step for Beginners effectively
Begin with basic shapes like circles & rectangles. Focus on proportions & angles next. Outline your figure lightly with a pencil. Add details gradually. Enhancing features & forms. Use reference images for accuracy & inspiration. Practice regularly; consistency builds confidence. Seek feedback from peers for improvement.
Key benefits of using Easy Basketball Drawing: Step-by-Step for Beginners
- Enhances artistic skills with structured guidance.
- Boosts confidence through understandable methods.
- Encourages creativity & personal expression.
- Provides relaxation through enjoyable practice.
- Facilitates sharing ideas within communities.
Challenges with Easy Basketball Drawing: Step-by-Step for Beginners & potential solutions
Beginners face frustration from skill gaps. Seek tutorials or classes for added support. Time constraints limit practice; dedicate short periods daily. Perfectionism hinders progress; focus on improvement instead. Limited resources restrict growth; explore online platforms for guidance. Collaboration with others cultivates a supportive environment.
Future of Easy Basketball Drawing: Step-by-Step for Beginners
Growing interest in basketball art continues. Innovative digital tools expand creative possibilities. Artists increasingly share their work globally. Online communities thrive. Encouraging collaboration & learning. Future trends may blend augmented reality with drawing techniques. Exploration of diverse styles enhances artistic expression.
Table of Easy Basketball Drawing: Step-by-Step for Beginners
| Step | Description |
|---|---|
| 1 | Gather materials needed for drawing. |
| 2 | Choose a reference image. |
| 3 | Sketch basic shapes lightly. |
| 4 | Add details gradually. |
| 5 | Finalize with dark pencil or ink. |
Understanding Basic Basketball Shapes
Basketball drawing requires understanding simple shapes. Start with basic geometric forms. Circles. Rectangles, & lines form a strong foundation.
Draw a large circle for a head. Then add a smaller rectangle beneath for The body. This basic structure leads To more complex forms. Check this YouTube tutorial for visual guidance.
Use simple shapes for limbs. Two lines can represent arms. Use additional lines for legs. Keep proportions in mind. Small changes can enhance detail.
Sketching Basketball Players
Next. Draw a basketball player. Position The body in action. A player can be shown dribbling or shooting. Choose an engaging posture for dynamic effects.
Begin with outlined shapes. Outline limbs connected To The body. Add curves for joints. Don’t forget details for muscles. Shading adds depth To your drawing as well.
Use an external resource while practicing sketching. This Pinterest link offers various references for sports drawing.
Working on Basketballs
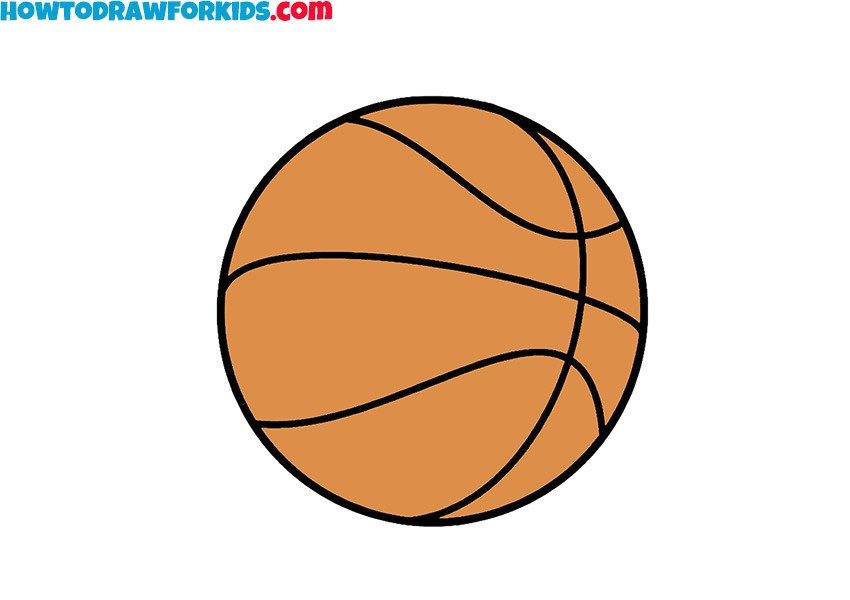
Now focus on drawing basketballs. Start with a circle. Ensure radius remains consistent. Start by outlining The sphere closely.
Add distinctive lines To signify texture. Use curved lines To create a realistic feel. Hatching technique helps develop a threedimensional look.
Shading can enhance realism. Observe light & shadow effects. Play with gradients as you apply shading around The ball.
Enhancing The Background
A detailed background improves overall artwork. Consider indoor or outdoor courts. Recapture energy brightening your drawing.
Include elements like bleachers or audience members. Draw borders for basketball courts. A simple outline efficiently defines space.
Add more features To vivify backgrounds. Use colored pencils or markers for added detail. Visualize backgrounds reflecting activity around players.
Incorporating Motion & Action
Motion adds energy. Focus on showing dynamic movements. Emphasize body lean & leg position for realistic portrayal.
Use motion lines around players. Action lines convey speed. Vary line thickness for dramatic portrayal.
Practice sketching multiple poses. Capture various actions across drawings. This versatility enhances understanding of movement.
Choosing Colors Wisely
Color significantly impacts your artwork. Choosing a wellthoughtout palette enhances visuals. Consider vivid oranges for basketballs or uniforms.
Blend & layer colors for depth. Combining colors creates striking visuals. Adjust brightness To reflect realistic lighting.
Experiment with different combinations. Enjoy using pens. Colored pencils. Or markers for variety. Gradients achieve smoother transitions.
Utilizing Textures & Patterns
Introduce textures for clothing & basketballs. Techniques like hatching or stippling enhance realism. Such variety adds detail To your work.
Experiment with geometric patterns. Stripes. Dots. Or checks offer interesting designs. Patterns accentuate players’ uniforms effectively.
Use texture To achieve contrast. Ensure smooth surfaces differ from rugged surfaces. This interplay creates stunning visuals.
Practicing Proportions
Proportions play an essential role in drawing. Sketching players requires understanding relative sizes. Use references for accurate proportions.
Establish guidelines while sketching. Mark joints. Heads, & limbs for accuracy. Consistent measurements improve drawings significantly.
Continuous practice solidifies skills. Measure distances carefully. Correct proportions ensure characters appear charming.
Exploring Different Angles
Vary angles for more engaging drawings. Drawing players from various perspectives enriches illustrations. An upward perspective feels dynamic & powerful.
Experiment with overhead views. Showcase basketball actions creatively. Such perspectives improve spatial awareness in your pieces.
Practice makes perfect. Challenge yourself by sketching from unconventional angles. These variations broaden artistic vision greatly.
Feedback & Improvement
Regular critique accelerates growth. Share your drawings with friends or online communities. Constructive criticism sharpens skills immensely.
Learn from comments. Identify areas needing improvement. This feedback fosters a healthy learning environment.
Iterate on suggestions. Incorporate thoughts into future artwork. Constant refinement leads toward better results over time.
Choosing Tools for Drawing
Selecting proper tools enhances The drawing experience. Pencils. Charcoal, & watercolors each offer unique results. Experiment with various instruments.
Quality materials matter. Use thicker sketch paper for better durability. Avoid flimsy sheets that can tear easily.
Find styles that resonate with you best. Personalize your toolkits according To preferences. Unique tools inspire creativity in unexpected ways.
Embracing Stylization
Stylization transforms drawings into personal expressions. Explore varying techniques & genres. Minimalistic styles create striking visuals with simplicity.
Explore cartoonish styles or realistic portrayals. Vivid colors & exaggerated features captivate viewers. Flexibility fosters creativity & enjoyment.
Adapting unique styles encourages individual artistry. Pursue experimentation without limitation. Art reflects personal expressions. Making each piece unique.
Finalizing Your Basketball Drawing
Final touches wrap up your basketball drawing. Refine characters. Ensuring clarity. Check outlines for consistency & neatness.
Layer final colors or details where necessary. Ensure your piece accurately reflects envisioned style. Add shadows for depth around figures.
Consider framing options. Display artwork proudly once finalized. Sharing it with friends showcases your journey.
Continuing Your Drawing Journey
Drawing continuously expands room for growth. Share creations online. Seeking feedback regularly To improve. Engaging with communities fosters inspiration & creativity.
Try different subjects. Beyond basketball. Paintings. Illustrations. Or cartoons can inspire further exploration. Art evolves with every new experience.
Draw regularly. Commitment & consistency build strong foundational skills. Keep pursuing art. Allowing it To flourish.
- 🎨 Simple shapes as building blocks
- 🏀 Dynamic poses for players
- 🖌️ Variety of coloring methods
- 📐 Importance of proportions
- 🖋️ Choices in tools matter
- 🌟 Embracing unique styles enhances creativity
- 🖼️ Final touches bring artwork To life
From personal experience. I found basketball drawing massively rewarding. Each step teaches different techniques. It becomes an exciting journey of continuous improvement.

Materials Needed for Easy Basketball Drawing
Before starting your journey into basketball drawing. Gather essential materials. Having everything ready ensures a smooth process. Here’s a simple list of items needed:
- Pencil
- Paper
- Eraser
- Black marker
- Coloring pencils or markers
A good quality pencil helps with sketching. Select a smooth paper for better results. An eraser helps correct mistakes easily. A black marker creates bold outlines. Coloring pencils or markers bring your creation To life.
Make sure your workspace is welllit. This makes drawing easier & more enjoyable. Gather all materials beforehand; organization saves time.
Basic Shapes for Basketball Drawing
Start your drawing by understanding basic shapes. Each part comes together by combining simple forms. Use circles. Ovals, & rectangles as building blocks.
Draw a large circle for a basketball. Add two smaller circles above for shoulders. Use a rectangle for legs & arms. This approach helps create a proportionate figure.
Once you grasp basic shapes. Refine them. Simplify complex forms into line sketches. This method forms a solid foundation for your drawing. For more illustration tips. Check this detailed guide.
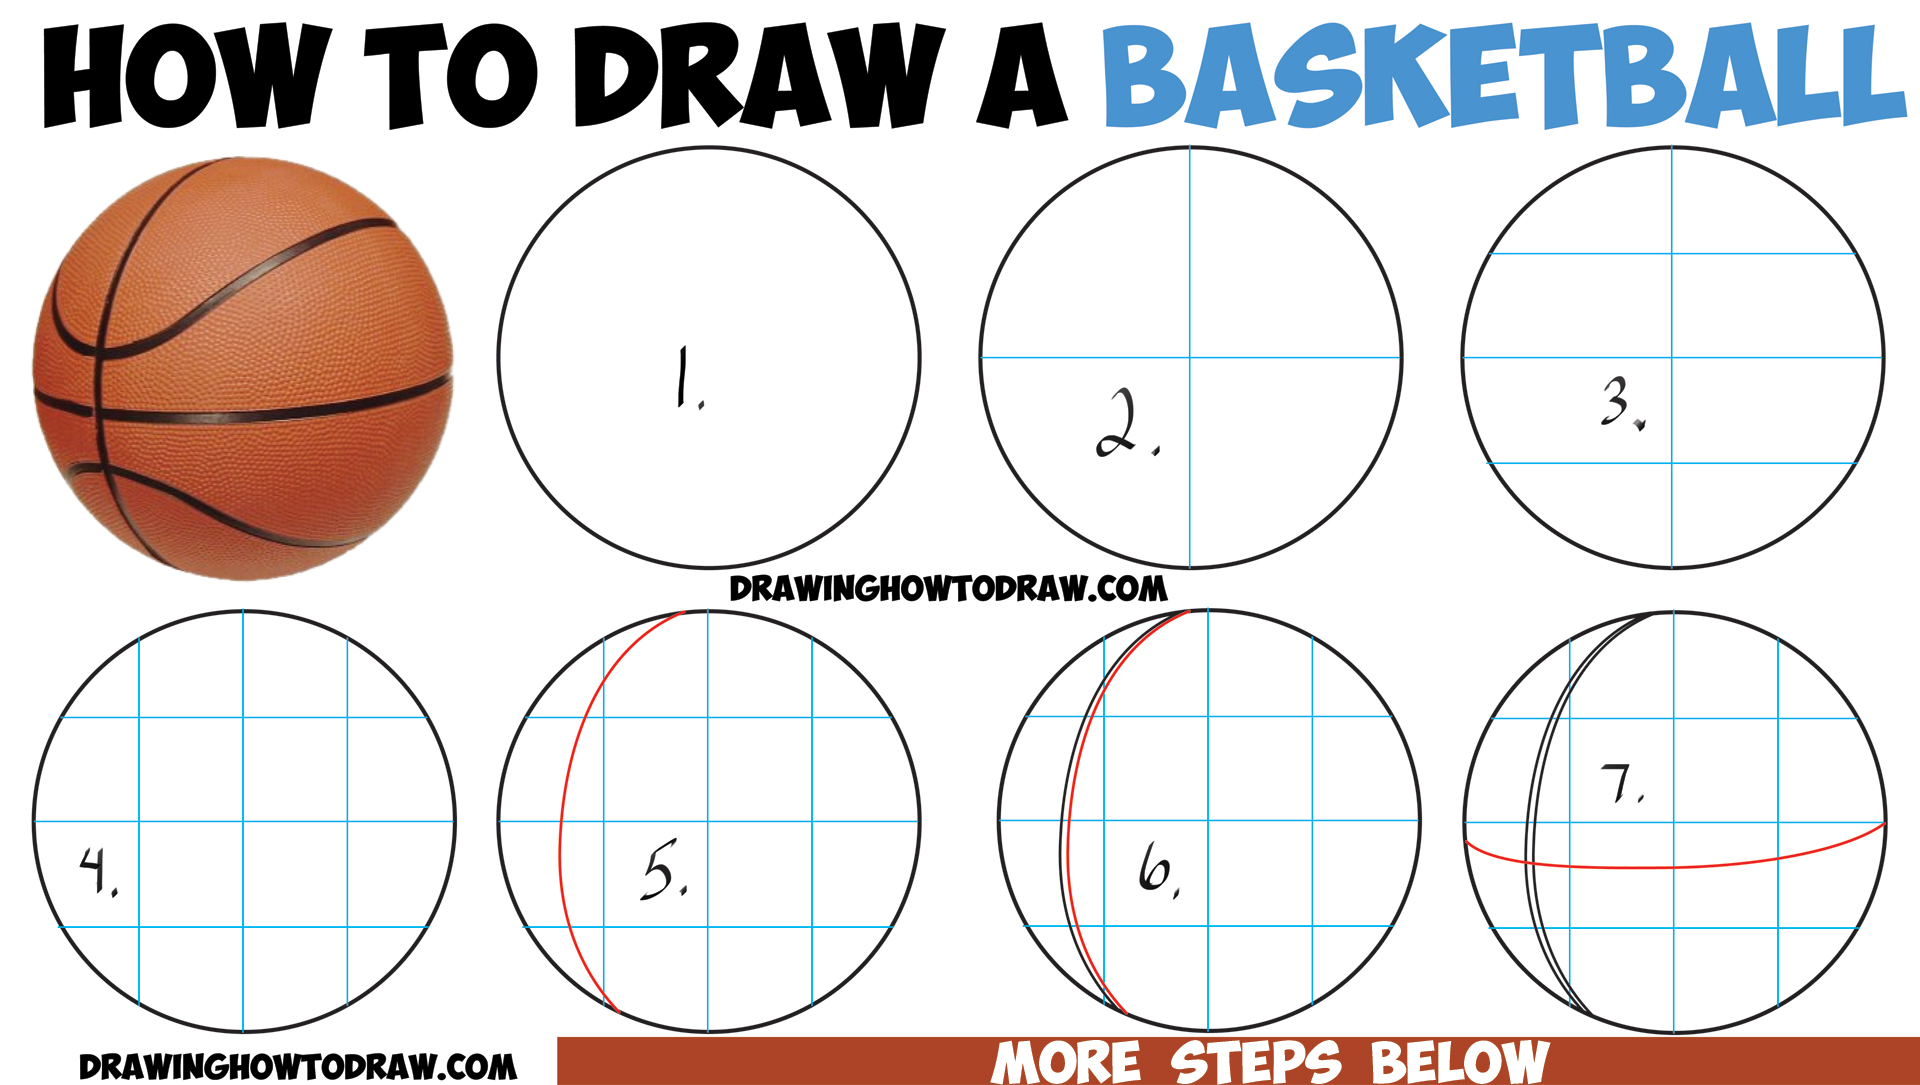
StepbyStep Drawing Guide
Follow these steps for an easy basketball drawing. Start with The basketball shape. Sketch a circle. Then add details.
Draw curved lines parallel towards The center. Make sure lines create a realistic look. Proceed with drawing player elements. Pay attention To proportions & spacing.
For a visual guide. Watch this YouTube tutorial. Observing someone else’s technique can enhance your understanding.
Adding Details To Your Basketball Drawing
Details add personality & character. Give attention To facial expressions on players. Body posture shows motion & excitement in sport.
Start by sketching facial features. Add eyes. Nose, & mouth. Position them To convey emotion. This makes your drawing more engaging & dynamic.
Enhance body movements by capturing action poses. Sketch flowing lines that imply movement. Focus on details like fingers on The basketball. Capturing these nuances elevates your art.
Coloring Techniques for Basketball Images
Coloring brings life To your drawing. Choose vibrant colors for uniforms & basketball. Begin with The base color. Then add shading for depth.
Use lighter shades for highlights. This creates a threedimensional effect. Apply darker shades for shadows To contrast different areas.
Experiment with color combinations. Try various palettes until you find what suits you best. This exploration can lead To unique creations.
Comparison of Drawing Techniques
| Technique 📏 | Details ✏️ | Tools 🖌️ |
|---|---|---|
| Basic Shapes | Simple forms guide proportions | Pencil. Paper |
| Line Drawing | Focus on outline clarity | Black Marker |
| Coloring | Add life through color choices | Coloring Pencils |
| Shading | Enhance depth perception | Brush. Pastels |
| Texturing | Create realistic effects | Various Pens |
Personal Experience in Drawing Basketball
I remember my first attempt drawing basketball. Excitement bubbled as I sketched. My hands shook slightly while holding a pencil. Simple shapes turned into something special.
Colors exploded on my drawing. I felt pride as vibrant shades filled my basketball sketch. Each stroke built confidence; practice became more enjoyable. I can say my journey began from that moment.
Final Touches in Your Basketball Drawing
Once completed. Evaluate your drawing. Look for areas requiring improvement. Small adjustments can make a big impact. Enhance outlines with a marker for clarity.
Consider framing your artwork. This gives a sense of accomplishment. Displaying your creation motivates continued practice & growth. Sharing with friends creates joy.
Every artist begins as a beginner. Learn. Practice, & most importantly. Enjoy. Your journey into basketball drawing has only begun.
What are The basic shapes To start a basketball drawing?
Begin with simple shapes like circles for The ball & rectangles for The court. This will help you build The drawing layer by layer.
How can I draw a basketball?
Start with a circle. Then add guidance lines To divide it into sections. Add The signature grooves of a basketball To give it texture.
What materials do I need To draw basketball?
You can use pencils. Erasers. Sketch paper, & colored pencils or markers for detailing. Having good quality materials can enhance your drawing experience.
Is it important To sketch lightly first?
Yes. Sketching lightly allows for easy corrections. Once you’re satisfied with The shapes. You can go over them with darker lines.
How do I add shading To my basketball drawing?
Identify a light source & use darker shades on The opposite side To create depth. Blending can also help To make The shading look more natural.
Can I draw basketball players easily?
Yes. Start with basic shapes To outline The body & limbs. Gradually refine The shapes. Adding details like facial features & clothing.
How do I draw a basketball hoop?
Begin with an oval for The rim, & connect it To a rectangular backboard. Make sure To add details like The net & mounting supports for realism.
What is The best way To learn basketball drawing?
Practice regularly while following tutorials. Analyze existing basketball drawings To understand different techniques & styles.
Should I use references when drawing basketball scenes?
Using references can greatly help in capturing accurate details & proportions. Study photographs or videos of basketball games for inspiration.
How can I create a 3D effect in my drawings?
To create a 3D effect. Use perspective techniques. Make objects closer appear larger & objects further away smaller.
Are there specific drawing techniques for beginners?
Start with basic outlines. Use crosshatching for shading, & practice contour drawing To improve your skills gradually.
What common mistakes should beginners avoid?
Avoid rushing through The process & neglecting proportions. Take your time To observe & correct any mistakes early on.
How can I make my basketball drawings more dynamic?
Incorporate action poses & angles. Experiment with different perspectives To add movement & excitement To your drawings.
Should I color my basketball drawings?
Coloring can add vibrancy To your work. Experiment with different color schemes. But remember To keep it consistent with The sport’s themes.
How often should I practice drawing basketball?
Practice regularly. Ideally several times a week. Consistency is key To improving your drawing skills over time.
Conclusion
In conclusion, drawing basketball scenes can be a fun & rewarding experience for beginners. By following simple step-by-step instructions, you can create impressive illustrations without feeling overwhelmed. Remember To take your time & enjoy The process! Don’t worry about making everything perfect; practice & creativity are what truly matter. Keep experimenting with shapes & colors, & soon you’ll see your skills improve. So grab your pencil & paper, & let your imagination take The court. With a little patience, you’ll be amazed at what you can create! Happy drawing!