
How to Curl Hair with a Curling Iron: Step-by-Step Tutorial. Learn how To curl your hair effortlessly with our easy stepbystep tutorial! Get beautiful. Bouncy curls using a curling iron in no time. Perfect for beginners!
What is How To Curl Hair with a Curling Iron: Step-by-Step Tutorial & how does it work?
Curling hair with a curling iron transforms straight locks. Different sizes create various curl types. Curling irons use heat. Hair wraps around a heated barrel. Heat alters hair’s structure. Leading To curls.
Brief history of How To Curl Hair with a Curling Iron: Step-by-Step Tutorial
Curling irons emerged during late 19th century. Early models used metal. Heated on stoves. In 1920s. Electric versions became popular. Styles shifted over decades. From finger waves To glamorous curls. Today. Diverse options exist for all hair types.
How To implement How To Curl Hair with a Curling Iron: Step-by-Step Tutorial effectively
Gather necessary tools before starting. You’ll need a curling iron. Heat protectant. Hair clips, & comb. Begin with dry. Clean hair. Apply protectant evenly throughout hair. Section hair into manageable parts. Wrap hair around barrel. Ensuring a good grip.
Key benefits of using How To Curl Hair with a Curling Iron: Step-by-Step Tutorial
Curling irons provide flexibility with styles. They suit various occasions. From casual looks To elegant events. Easy adjustments allow for tight or loose curls. Quick heating saves time in busy mornings. Beautiful. Voluminous curls enhance overall appearance.
Challenges with How To Curl Hair with a Curling Iron: Step-by-Step Tutorial & potential solutions
Burns often occur without proper technique. Use gloves for protection from heat. Inconsistent curls may arise from unbalanced sections. Ensure each section has uniform thickness. Split ends can interfere with curls. Regular trims help maintain hair health.
Future of How To Curl Hair with a Curling Iron: Step-by-Step Tutorial
Table of How To Curl Hair with a Curling Iron: Step-by-Step Tutorial
| Step | Description |
|---|---|
| 1 | Gather tools & prepare hair. |
| 2 | Apply heat protectant evenly. |
| 3 | Section hair for easy styling. |
| 4 | Wrap hair around barrel carefully. |
| 5 | Hold for a few seconds. Then release. |

Understanding Your Curling Iron
Curling irons come in different sizes. Shapes, & types. Knowing your curling iron well helps you achieve desired results. Each tool has unique features which impact curling style. Select one that matches your hair type & preferred curl style. Higher barrel sizes yield loose waves. Smaller barrels create tight curls. Consider both barrel size & material when choosing.
Most common materials include ceramic. Titanium, & tourmaline. Ceramic irons distribute heat evenly & can reduce damage. Titanium heats quickly. Providing strong curls for thick hair. Tourmaline emits negative ions. Fighting frizz effectively. Each material has specific advantages. So pick one accordingly. For an indepth understanding. Check this video tutorial for insights.
Selecting an appropriate size also depends on your hair’s length. For shorter hair. Choose a curling iron with a smaller barrel. If your hair is longer. A larger barrel may suit better. Take time assessing your hair type before making a purchase. Finding a perfect curling iron can transform your styling routine & enhance results.
Preparing Your Hair for Curling
Preparation is essential for achieving beautiful curls. Start by washing your hair with a quality shampoo & conditioner. Clean hair allows for better styling & curl retention. After shampooing. Use a heat protectant spray. This product shields hair from heat damage caused by hot tools.
Dry hair properly before using your curling iron. Use a blow dryer or let it air dry naturally. High moisture levels can prevent curls from setting effectively. Once your hair is dry. Consider applying a lightweight styling product. This can add texture & hold. Ensuring curling lasts all day. For more shaping ideas. Explore this guide here.
Section your hair before curling. Divide it into manageable parts. Clip sections up. Working in smaller segments ensures optimal styling. Start with lower layers & gradually work your way up. Each section should be between one & two inches wide. This helps maintain uniform curls throughout your hairstyle.
Choosing The Right Heat Settings
Heat settings play a crucial role in achieving curls. Different hair types require varying heat levels. Thick. Coarse hair often needs higher temperatures. Fine. Delicate hair benefits from lower settings. Using excessively high heat can lead To damage & breakage.
Most curling irons offer adjustable heat settings. Use these settings wisely. Experiment with lower temperatures first. Then increase if necessary. Allow hair & iron sufficient time To adjust. Always prioritize hair health while styling. Time spent understanding heat settings pays off later.
Monitor hair condition continuously while curling. If curls aren’t forming well enough. Consider adjusting settings. Consistency remains vital throughout this process. Finding that sweet spot takes practice. Particularly with varying hair textures & iron types.
The Curling Technique
Mastering curling technique takes practice. Begin by picking up a section of hair. Position curling iron so that The barrel faces away from your face. Wrap hair around The barrel. Starting at The ends. Ensure strands lay flat against The barrel for even curls.
Hold hair in place for around 10 seconds. Using a timer helps maintain consistency. Once time passes. Gently release hair. Allow curls To fall naturally rather than pulling them out quickly. This helps maintain curl shape & prevents frizz.
For different styles. Adjust how hair wraps around The curling iron. For beachy waves. Alternate wrapping directions. This creates a more relaxed appearance. Trying various techniques keeps your hairstyle fresh. Allowing you To play with different looks.
Common Mistakes When Curling Hair
Awareness of common mistakes helps improve styling outcomes. One frequent mistake involves applying too much hair per section. Too thick sections result in uneven curls. Stick with sections that are manageable. Smaller sections create more defined curls.
Another mistake happens with heat settings. Many people choose inappropriate temperatures for their hair type. Higher temperatures may cause damage. While lower settings may yield no curls. Conduct research beforehand or perform strand tests To find optimal settings.
Rushing through styling can create a less polished look. Patience remains essential when curling hair. Take time for each section & avoid hurrying through The process. Allowing hair ample time on The iron yields better results.
Finishing Touches for Curls
After styling your curls. Consider finishing touches for a complete look. Using hairspray helps lock curls in place. Choose a lightweight formula that provides hold without stiffness. This ensures curls remain flexible & movement stays natural.
Additionally. You may want To separate curls. Gently run fingers through curls after they cool down. This technique creates a fuller. More voluminous appearance. Avoid aggressive combing or brushing. As this may lead To frizz.
For added shine. Apply a light serum or oil. This can enhance overall appearance. Making curls look healthy & glossy. Apply product sparingly. Focusing on The ends of your hair. Less is more; overapplying can weigh down curls.
Maintaining Curls Throughout The Day
Keeping curls intact all day can pose challenges. Begin with prepping hair as mentioned earlier. A strong foundation significantly affects how long curls last. Ensure you use quality styling products tailored for holding curls.
Once hair has been styled. Avoid excessive touching. Playing with curls throughout The day can lead To loss of shape. Instead. Embrace curls as they are. Monitor any frizz throughout your day & keep a small comb or brush handy.
Additionally. Consider carrying a travelsized hairspray for quick touchups. A quick spritz can give your curls a refreshing boost if needed. Hydrating mist can also help restore moisture. Preventing dryness & frizz.
Tips for Different Hair Types
Each hair type brings unique challenges & opportunities while curling. For fine hair. Opt for lower heat settings & lightweight products. Avoid heavy styling gels. As they can weigh hair down. Focus on producing waves rather than tight curls.
Medium textured hair allows for more versatility. Use moderate heat settings for optimal results. Styling with a curling iron can effectively create any look you prefer. From smooth waves To defined curls. Many options fit medium hair.
Thick hair often requires higher heat settings for curled styles. Invest in a quality curling iron that can withstand high temperatures. A larger barrel might create more volume. While a smaller barrel creates defined curls. Be mindful To frequently check hair health when styling thick locks.
Using Other Tools To Create Curls
Exploring various tools for curling expands your styling options. Besides curling irons. Hot rollers offer effortless curling solutions. Rollers can be ideal for creating loose. Voluminous curls. They can set while you perform other tasks. Making them timeefficient.
Another option includes styling wands. Unlike traditional irons. These do not feature clamps. A wand can create beautiful. Naturallooking curls. Wrapping hair around wands provides flexibility in creating waves or curls.
Consider using straighteners as well. Surprisingly. They can form curls when used correctly. Heat The straightener & clasp around a section of hair. Then twist while moving downward. This technique offers another method for curling. Catering To those with limited tools.
Protecting Your Hair from Heat Damage
Heat damage remains a significant concern when styling hair. Always apply a heat protectant before utilizing hot tools. These products minimize damage. Helping maintain hair health over time. Opt for sprays or creams aligning with your hair type for best results.
Frequent heat styling can affect your hair’s integrity. Schedule regular breaks from hot tools. Allowing hair a rest period aids recovery & reduces overall damage. On nonstyling days. Consider gentle hairstyles or natural looks.
Regular trims also contribute positively To hair health. Schedule appointments every six To eight weeks. Removing split ends improves hair appearance & texture. Healthy hair can hold curls better. Yielding longerlasting styles.
Choosing The Right Products for Curls
Selecting proper styling products plays a vital role in achieving beautiful curls. Styling creams & mousses can enhance texture. Look for products designed specifically for curls. Avoid those with heavy oils or ingredients that weigh hair down.
Hairsprays come in various formulations. Opt for flexible hold sprays instead of strong ones for natural movement. This ensures curls remain bouncy while offering sufficient hold. A light touchup can maintain your style all day long.
Lastly. Consider serums or oils designed for curling hair. These products can enhance shine & reduce frizz. Apply sparingly. Focusing on ends instead of roots. A balanced approach ensures curls remain vibrant without appearing greasy.
Experimenting with Different Curling Techniques
Wanting variations in your hairstyle allows for continuous experimentation. Variations can include different curling iron techniques. For instance. Wrapping hair around The iron in varying directions creates unique. Lively styles.
Try using two different barrel sizes during your styling session. This creates a mix of tight & loose curls. Resulting in depth & dimension. Alternating between tools also allows for greater versatility. Keeping your hairstyle fresh.
For those seeking unique looks. Consider combining styles. Braid sections before curling for a texturized appearance. Using small braids can yield beachy waves. Keep experimenting until you find combinations that suit your taste perfectly.
Final Thoughts on Curling Hair with Curling Iron
Practice makes perfect in mastering hair curling techniques. Always prioritize heat protection To maintain hair integrity. Don’t hesitate trying different techniques & products To discover your preferences. Progress comes through experimentation. Allowing your skills To grow.
- Different barrel sizes available 🎉
- Adjustable heat settings 🔥
- Multiple styling techniques 🤗
- Easy maintenance & touchups 👍
- Longlasting curls 🌟
- Suitable for various hair types 🌈
- Gorgeous. Salonquality results 💁♀️
:max_bytes(150000):strip_icc()/curl-hair-with-flat-iron-GettyImages-1781794761-60ce71b7b8304c72b4a5f8dbad2d67f3.jpg)
What You Need for Curling
Before starting this curling journey. Gather essential tools. A curling iron. Of course. Must be your first choice. Besides that. Some hair spray helps hold curls. Use a heat protectant To save hair from damage. A comb or brush keeps hair tanglefree. Hair clips will assist in sectioning your hair while curling. Consider investing in a goodquality curling iron for best results. Heat settings matter. Remember. Not all hair types require same temperature.
Gather all supplies in one space for easy access. This setup saves time & energy during styling. Throughout this process. Confidence in using tools grows. Choosing The right size curling iron matters significantly. Smaller barrel sizes create tighter curls. While larger ones result in looser waves. Also. Adjusting temperatures based on hair texture ensures better curl retention.
Your experience will be enhanced when familiarizing yourself with tools. Experimentation leads To discovering personal favorites. Some prefer natural waves while others opt for defined spirals. Ultimately. Having quality tools ensures a successful curling experience each time. Remember. Preparation helps you achieve flawless styles easily.
Sectioning Your Hair Properly
Sectioning hair appropriately ensures efficient curling. Start by dividing hair into manageable sections. For best results. Create four sections—two at front & two at back. Use hair clips or ties To secure sections that won’t be curled. This step prevents overlaps & tangling. Making curling smoother. Having clear sections improves styling accuracy.
Begin with The bottom sections. Letting your curls fall naturally gives a relaxed vibe. Focusing on one section at a time avoids chaos. Curly styles appear polished when curls are carefully crafted. After curling. Secure curls with clips for a few minutes. This helps set style. Take time preparing sections before diving into curling.
By properly sectioning hair. Overall curls turn out better. Use various techniques based on desired styles. More sections allow for tighter curls. Less sections create larger waves. Always adjust section sizes according To your preferences. Enthusiasm about sectioning leads To better final results. Organizing brings joy To styling sessions.
Choosing Right Curling Iron
Choosing The right curling iron affects final results a lot. Sizes vary from small barrels To large ones. Each size produces different styles. Consider personal preference before buying. For defined curls. Opt for smaller barrels. If relaxed waves sound better. Choose larger ones. Always consult your hair type when selecting tools.
Temperature settings also play a significant role. Higher settings work well for thicker hair types. Conversely. Lower settings suit fine or damaged hair perfectly. To maximize styles. Pay attention To quality as well. Investing in a highquality curling iron pays off in long run. A good iron lasts longer & curls better.
Take into account any features offered by curling irons. Some feature automatic shutoff for safety. Which can be a lifesaver. Consider features like variable heat settings. Which provide flexibility during styling. Reviewing customer feedback can provide useful insights. Keep functionality in mind while browsing for curling tools.
Preparing Your Hair for Curling
Preparation makes styling easier & more successful. Start by washing hair with a good shampoo & conditioner. This step helps remove dirt & product buildup. Allow hair To air dry slightly before applying heat protectant. Always apply a heat protectant before using any styling tools. This crucial step minimizes damage caused by heat.
Ensure hair remains dry before curling. Wet hair won’t hold curls as well. When hair dries completely. Brush through once To eliminate tangles. This ensures all sections remain smooth & manageable. Healthy hair creates a perfect canvas for styling. Avoiding product buildup leads To better results.
Some suggest using a light mousse or styling cream To add texture. Products can enhance curls if applied right away. Always strive for naturallooking curls without excessive product. Read more about this technique & other tips at this link. Properly preparing hair guarantees better outcomes & helps all curls last longer.
Steps To Curl Hair with a Curling Iron
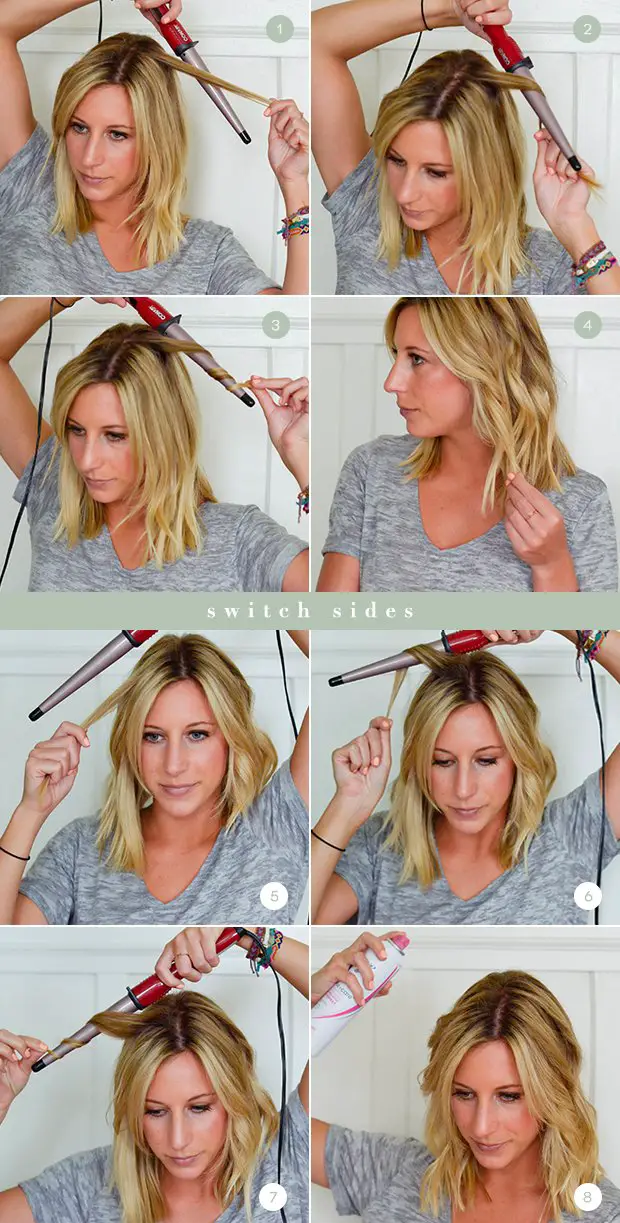
Step 1: Starting The Curling Process
Once ready. Take The curling iron & plug it in. Adjust settings based on hair type. Waiting several minutes allows The iron To heat up properly. Always keep The iron away from your face while heating. Safety first To avoid accidental burns during this process. Grabbing a small section of hair allows control during curling.
Start curling from The base of your hair. Wrap The section of hair around The barrel. Moving towards The tips. Hold it in place for about 10 seconds for perfect curls. Releasing The curl carefully helps maintain its shape. Repeat this process for every section you prepared earlier.
If you’re looking for a more visual guide. Check out this helpful [YouTube tutorial](https://www.youtube.com/watch?v=FzV9pbIqY4). Watching how it’s done can greatly assist beginners. Remember that practice makes perfect. So don’t rush this process. Take your time & enjoy each step of curling.
Step 2: Curling Technique Variations
Using various techniques creates different curl styles. For beach waves. Try wrapping hair only halfway around The barrel. This method avoids tight ringlets & leads To looser waves. Switching directions while curling can add dimension. Alternate between curling away & towards your face for a more natural look.
As progression continues. Experiment with different section sizes. Larger sections create loose waves. While smaller sections lead To bouncy curls. This flexibility allows you To style depending on occasion. Be mindful that avoiding uniform curls leads To a more effortless. Natural look.
Hot tools can create abundant styles. Always apply product To maintain curls after styling. You can use hairspray or light hold gel. According To preference. Setting The entire look helps prevent curls from falling flat quickly. Find out what suits your personal style best while creating variations.
Step 3: Finishing Touches
Finish curling all hair sections & allow them To cool. This cooling process helps enhance curl longevity. Afterward. Gently run fingers through curls for a softer look. This step allows unwanted tightness To fade away. Spraying hair with a light mist of hairspray ensures curls hold longer throughout wear.
Feel free To accessorize your hair after curling. Hair clips or decorative pins can add flare. Experiment with different hairstyles based on your outfit. This customization makes all styles truly yours. Using accessories creates unique looks for special events or daily wear.
Lastly. Embrace your beautiful curls! Show off your hard work & enjoy compliments. Your effort truly pays off when others notice The stunning results. Celebrate your styling achievements, & remember. Practice makes perfect.
Table: Comparing Curling Techniques
| Technique | Description | Effect | Difficulty | Emoji |
|---|---|---|---|---|
| Classic Curls | Wrap hair fully around barrel. | Tight & defined curls. | Medium | 🔄 |
| Beach Waves | Wrap hair only halfway. | Soft & loose waves. | Easy | 🏖️ |
| Alternating Styles | Curl away & towards your face. | Natural. Freeflowing look. | Medium | 🎨 |
| HalfUp Styles | Curl bottom half only. | Balanced look. | Easy | ✨ |
| Curls with Clips | Use clips To set curls. | Defined style through cooling. | Medium | 📎 |
Maintaining Curls After Styling
Maintaining gorgeous curls after styling helps them last longer. One key aspect involves using quality products. Choose light hairsprays designed for curls. Use gentle formulas that don’t weigh curls down. Avoid heavy products that can lead To greasiness quickly. Healthy styles survive longer with proper maintenance.
Protecting curls from humidity remains crucial. Use antifrizz serums To avoid unwanted frizziness throughout The day. Remember. Hair care goes beyond styling. Properly moisturizing hair helps curls stay defined. Regular trims ensure hair stays healthy. Which directly impacts curl quality.
Consider styling at night before special occasions. Using methods like curls overnight can save time. In The morning. Refreshing your curls becomes quick & simple. This timesaving technique allows you To enjoy a polished look without much hassle. Treat your curls right for longlasting beauty.
My Personal Curling Experience
I recall my first curling attempt vividly. I felt nervous. Not knowing how curls would turn out. Practicing made me more confident over time. With each attempt. I discovered techniques that worked best for me. Eventually. I learned how To create styles quickly.
Curling iron became my best friend. Choosing a barrel size became a gamechanger. I preferred larger sizes for loose waves. Smaller barrels worked when I wanted tighter curls. Every styling session felt like an adventure worth sharing.
Now. I enjoy experimenting with different techniques. Whether going for casual waves or elegant curls. My skills have improved immensely. I can style various looks for any occasion. It’s a rewarding journey I continue To embrace every day.
What type of curling iron should I use for curling my hair?
You should choose a curling iron with a barrel size that suits your desired curl type. A smaller barrel (0.5 To 1 inch) creates tighter curls. While a larger barrel (1.5 To 2 inches) produces looser waves. Ensure The iron has adjustable heat settings for better control.
How do I prepare my hair before curling?
Start by washing & drying your hair. Apply a heat protectant spray evenly To safeguard your strands from heat damage. It’s also helpful To use a volumizing mousse or spray for extra body.
How do I section my hair for curling?
Divide your hair into several sections for easier curling. Use clips To hold up The top layers while you work on The bottom layers. Typically. Four sections (two on each side) work well. But adjust based on your hair thickness.
What is The best temperature for curling hair with a curling iron?
The optimal temperature depends on your hair type. Fine or damaged hair should be curled at lower temperatures (250300°F). While medium To thick hair can handle higher heat (300400°F). Always start lower & increase as needed.
How do I curl my hair with a curling iron?
Take a small section of hair & clamp it in The curling iron. Twist The iron away from your face & hold it for about 1015 seconds. Release The hair gently & allow The curl To cool before touching it.
Should I curl my hair towards or away from my face?
Curling away from your face generally creates a more flattering & natural look. However. For a more dramatic style. You can alternate between curling towards & away from your face.
How long should I hold The curling iron on my hair?
Holding The curling iron for 1015 seconds is usually sufficient. Keep an eye on The curls; if they don’t hold. You may need To add a few seconds. But avoid overheating To prevent damage.
Can I use a curling iron on wet hair?
No. Using a curling iron on wet hair is not recommended as it can cause serious damage & lead To hair breakage. Ensure your hair is completely dry before curling.
How do I make The curls last longer?
After curling. Allow The curls To cool completely before touching them. Use a light hairspray To set The curls in place. Avoid running your fingers through The curls until they cool for better hold.
What should I do if The curls fall flat?
If your curls fall flat quickly. Try using a stronger hold hairspray or a styling product designed for curls. Additionally. Consider adjusting The size of The sections you curl or The heat setting on your iron.
How often can I use a curling iron?
Limit The use of a curling iron To 23 times a week To minimize heat damage. Always use a heat protectant spray & consider taking breaks from heat styling To give your hair some time To recover.
What tools do I need apart from The curling iron?
Aside from a curling iron. You’ll need a heat protectant spray. Hair clips for sectioning. A comb or brush To detangle, & optional styling products like mousse or hairspray for added volume & hold.
What are some common mistakes when curling hair?
Common mistakes include using too large sections of hair. Holding The iron for too long. Not using a heat protectant, & curling too close To The roots. Brush The curls out too soon can also lead To flattened curls.
How can I create beachy waves with a curling iron?
To create beachy waves. Alternate The direction of your curls & use a larger barrel curling iron. After curling. Use your fingers To gently separate & tousle The curls. Then apply a texture spray for a carefree look.
Is it necessary To use a hairspray after curling?
Using hairspray is not mandatory. But it helps To extend The life of your curls & prevent them from falling flat. Opt for a lightweight formula so it doesn’t weigh down The curls.
Conclusion
In conclusion, curling your hair with a curling iron can be a fun & rewarding process. By following these simple steps, you can create beautiful curls that enhance your look. Remember To prep your hair with heat protectant, choose The right barrel size, & vary The direction of your curls for a more natural finish. Don’t forget To allow The curls To cool & finish with a light hairspray To hold them in place. With a bit of practice, you’ll master this technique & enjoy stunning, bouncy curls that turn heads wherever you go! Happy curling!