

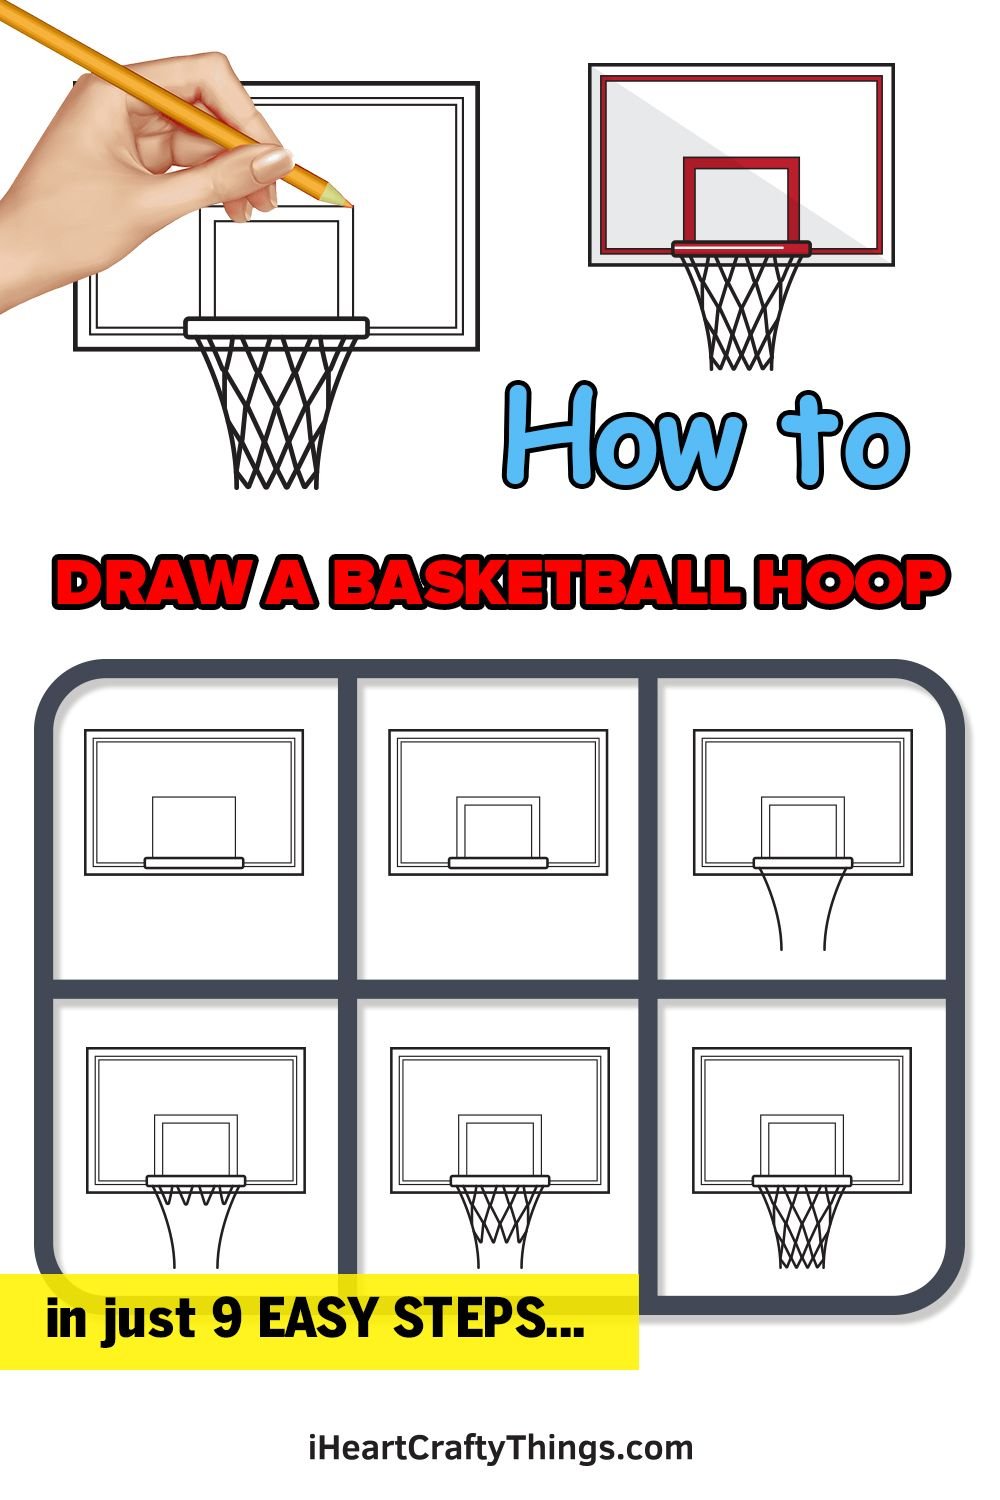
How to Draw a Basketball Hoop: Step-by-Step Guide. Learn how To draw a basketball hoop with our simple. Stepbystep guide! Perfect for beginners. This fun tutorial makes art easy & enjoyable. Grab your pencil!
What is How To Draw a Basketball Hoop: Step-by-Step Guide & how does it work?
Drawing a basketball hoop involves creating a circular rim. Backboard, & net. A clear understanding helps achieve realistic designs. This guide offers simple steps for beginners & advanced artists alike. Visual guides can enhance learning & skills development. Using various tools & techniques aids in perfecting your artwork.
Brief history of How To Draw a Basketball Hoop: Step-by-Step Guide
Basketball originated in 1891 in Massachusetts. Initial drawings focused on basic shapes & proportions. As popularity grew. So did artistic interpretations. Today. Multiple styles & methods exist. Artists often experiment with colors. Angles, & perspectives. Learning from past techniques enhances current skills.
How To implement How To Draw a Basketball Hoop: Step-by-Step Guide effectively
Begin with sketching basic shapes. Start with a rectangle for a backboard. Add a circle for rim placement next. Create a smaller circle within for The hoop. Lines for The net follow. Connecting from rim edges downwards. Depth & shadows enhance realism. Always keep proportions accurate throughout.
Key benefits of using How To Draw a Basketball Hoop: Step-by-Step Guide
Learning through this guide improves art skills. Visualization techniques foster creativity & imagination. Drawing basketball hoops enhances understanding of sports dynamics. Artists gain confidence while honing precision & accuracy. Enjoyment arises from seeing improvement in each attempt. Engaging with peers encourages collaboration & growth.
Challenges with How To Draw a Basketball Hoop: Step-by-Step Guide & potential solutions
A common challenge involves maintaining proper proportions. Use rulers or templates for accuracy. Another issue could be color selection. Experiment with various palettes until satisfied. Some may struggle with intricate net details. Practice simplifies these difficulties over time. Seeking feedback speeds up improvement through guidance.
Future of How To Draw a Basketball Hoop: Step-by-Step Guide
Art education continues evolving with technology. Digital tools may replace traditional methods. Online resources offer various tutorials & styles. Future artists should embrace new mediums & platforms. Anticipated trends include augmented reality assistance for drawing hoops. Collaboration among artists may inspire new techniques & creativity.
Table of How To Draw a Basketball Hoop: Step-by-Step Guide
| Step | Description |
|---|---|
| 1 | Sketch a rectangle for backboard. |
| 2 | Add a large circle for hoop. |
| 3 | Draw a smaller circle inside for rim. |
| 4 | Create lines for net from hoop edges. |
| 5 | Enhance depth with shadows & details. |

Understanding Basic Shapes
Starting with basic shapes helps significantly. Drawing a basketball hoop begins by visualizing its structure. A hoop consists of several components: a rectangle. A circle, & a net. Understanding these components allows you To create a solid foundation for your artwork. Observing real basketball hoops aids in capturing essential details. This way. Your drawing becomes authentic.
Start by sketching a rectangle for backboard. This forms initial part of hoop structure. Next. Draw a circle at bottom of rectangle. This circle represents rim. Make sure dimensions match typical sizes. Consider different hoop styles if desired. Visual references can enhance your understanding. For more guidance. Check this drawing guide.
Having a plan ensures proper layering for drawing. Prioritize foundational shapes first before adding details. Once these areas are established. Focus shifts toward refining shapes. This strategy reduces confusion. Making finalization easier. Keep practicing these basic shapes. As they serve many artistic endeavors.
Gathering Materials
Before starting any drawing. Gathering necessary materials is crucial. Choose a highquality pencil for sketching To allow for easy corrections. An eraser becomes an essential tool too. Enabling cleanups for mistakes. Use quality paper; prioritize smooth surfaces for best results. Sketchbooks provide versatility for drawing practice.
Consider using colored pencils or markers for vibrant finishes. These options allow for creative expression after initial sketches complete. Experiment with different mediums To discover personal styles. Every artist has a unique approach. So try various tools.
You may also find drawing guides. Like videos or articles. Useful. Reference images aid in visualizing final outcome. Contributing toward better artwork. Tools & resources greatly impact The learning experience. Allowing for smoother process overall.
Creating The Backboard
Begin by drawing backboard accurately. Position rectangle shape above where hoop will hang. Ensure corners appear sharp & edges align well. Consistent measurements contribute toward realistic representation. After finalizing rectangle. Smooth out lines for a polished look.
Next. Add details such as markings or brand logos commonly found on actual backboards. This small touch brings authenticity into your drawing. Ensuring alignments remain precise maintains clean appearance throughout. Incorrect proportions can detract from overall composition.
Observe reallife examples or images closely. Check various styles of backboards for inspiration. Documenting observations can enhance understanding of details. Utilize this knowledge when making artistic choices in your drawing.
Drawing The Rim
Creating rim requires attention To oval shape. Position it just below backboard. Centering adequately. This circle can be equal or slightly larger than standard sizes. Accurate placement ensures realism. Precision during this step gives character To artwork.
Next. Add thickness To rim. Drawing another circle around original. This ring shape emphasizes depth. Making drawing visually appealing. Focus on maintaining symmetry while shaping The rim. Authentic hoop details come alive through careful representation.
Consider surrounding elements too. Elements like poles supporting rim & additional hardware enhance authenticity. Balance proportions between rim. Backboard, & surrounding items. This creates a cohesive look in your artwork.
Sketching The Net
Sketching net complements rim nicely. Draw thin lines stemming from rim. Creating a gridlike pattern. Ensure these lines create a spherical look To mimic hanging net. Capture movement & fluidity present in actual nets.
Using gentle curves & wavy lines brings dynamism into your drawing. Keep lines loose & fluid; this approach captures net’s essence better. Avoid stiff lines as they detract from overall appearance.
Don’t forget that nets often sway when a basketball goes through. Including slight variations can enhance realism tremendously. Reference various net designs or use images for guidance. As helpful visual aids boost overall quality.
Applying Detail Work
Detail work significantly enhances drawing’s overall quality. Adding shading To backboard creates depth. Making drawing visually appealing. Use light pencil strokes for initial guidelines. Gradually apply darker tones for realistic shading effects.
Pay special attention To depth & light sources. Adding highlights on rim makes it pop against background. These subtle touches create visual interest while drawing. Aim for balance; avoid overdoing any single aspect while retaining harmony.
Consider textures as well. Including wood grain or metallic finishes improves realism. Incorporating textures transforms flat images into lifelike representations. Carefully observe reallife examples; textures serve as fundamental elements in drawings.
Choosing Colors
If planning To add color. Consider typical basketball colors first. Traditional orange basketballs contrast nicely against white nets. A vibrant background can provide an exciting flair; consider light blues or greens.
Combining colors enhances elements of basketball hoop. Keep color palette limited. Focusing on complementing tones. This way. Drawing remains cohesive. Explore various color combinations & experiment with effects.
Consider using markers. Colored pencils. Chalk. Or paint. Each medium offers unique effects. Allowing flexibility in artistic expression. Study how colors interact; this understanding will strengthen decisions made during drawing process.
Finalizing The Drawing
Once all components completed. Review entire drawing for any inconsistencies. Take a step back. Allowing fresh perspective. Identify areas needing more refinement or correction. This step ensures overall composition remains strong.
Clean up any stray lines or marks from earlier stages. A neat appearance reflects effort & attention To detail. This enhances final look. Showing viewers your dedication as an artist.
Adding additional elements enhances artistry. Consider incorporating background features. Like court markings or audience. These details make your drawing more engaging while displaying skillful execution.
Practice Makes Perfect
Understanding basic techniques allows improvement. Regular practice encourages honing skills over time. Create multiple versions of basketball hoop drawings through various styles & perspectives. This will enhance understanding of structure & form.
Utilize different materials during practice sessions. Experimenting expands creative boundaries & influences personal style. Each attempt reveals unique aspects. Fostering growth as an artist.
Seek constructive feedback from peers or mentors. Insights from others enhance skill development. Engaging in discussions about techniques & choices yields new ideas. Contributing toward mastering drawing techniques.
Utilizing References
Using references significantly boosts observational skills. Collect images of basketball hoops for study. Analyze dimensions. Colors, & details; understanding these aspects will improve your drawings. Observing multiple angles can also provide insights.
Platforms such as Pinterest offer abundant resources. Discover various styles. Illustrations, & techniques by exploring drawing boards. For example. View this Pinterest post for guidance.
Once you gather images. Create a visual library. Refer back To this library for inspiration during drawing sessions. Agreement with distinct artistic styles aids in defining personal approaches & preferences.
Exploring Different Styles
Artistic styles come in various forms. Including realism. Cartoon. Or abstract. Exploring different styles expands creativity while allowing personal expression. Choose a method that resonates with you best while sketching basketball hoops.
Certain methods may focus more on detail; others emphasize simplicity. Experimenting reveals unique perspectives. Fostering growth within artistry. Create numerous drawings. Exploring styles beyond comfort zones.
Document styles you enjoy in sketchbook; create a personal collection. This collection will serve as a reference & inspire future projects. Constant experimentation leads toward developing distinct artistry.
Incorporating Background Elements
Adding background elements enhances overall drawing appeal. Consider incorporating a basketball court or an audience cheering on. This context provides a narrative. Making artwork engaging. Background elements are vital for creating atmosphere.
Start with basic shapes for background elements. Gradually build layers; accomplish this by keeping background less detailed than main subject. This allows basketball hoop drawing To remain focal point.
Finishing touches create balance between subject & background. Consider integrating colors or gradients that harmonize with foreground. This leads toward cohesive compositions. Enhancing visual interest in artwork.
Sharing Your Artwork
Once satisfied with finished piece. Consider sharing your artwork. Showcase drawing on social media platforms or art communities. Sharing encourages positive feedback while gaining exposure for your creativity.
Engaging with other artists helps foster community connections. Participate in discussions or challenges To grow skills collaboratively. This builds relationships with fellow creatives. Enhancing collaboration opportunities.
Furthermore. Documenting your artistic journey adds personal value. Keeping track of progress aids in motivating oneself. Revisiting past work highlights growth. Encouraging continued exploration.
Creating a Personal Style
Refining a personal style marks significant milestone in artistry. Begin by examining favorite techniques & elements; understanding preferences enriches creative process. Experiment consistently until a unique signature develops naturally.
As you continue. Embrace uniqueness; individuality showcases creativity. Artists who remain true To themselves inspire others. Giving personal touches To their drawings. Trusting instincts leads toward authentic expression & fulfilling experiences.
Over time. Revisit early drawings; observe growth. Documenting progress highlights journey. Reminding artists how far they’ve come. Combine various influences. Ultimately crafting a unique identity within artistic landscape.

Materials Needed for Drawing
Gather essential supplies before starting. Pencils allow for easy sketching. Choose multiple erasers; they aid in corrections. Also. Have paper ready. Preferably sketching paper. Quality paper enhances overall outcome.
Markers & pens bring your artwork To life. Use colored pencils for vibrant details. Select goodquality highlighters for additional emphasis. A ruler helps ensure perfect measurements.
Don’t forget your creativity! Adding personal flair makes artwork unique. Inspiration boards can spark creativity. Explore various styles before settling on your approach.
Understanding Basketball Hoop Structure
Familiarize yourself with components of a basketball hoop. A hoop consists of several parts: rim. Net. Backboard, & pole. Each part serves unique functions in gameplay. Knowing their placements helps in accurate drawings.
Observe different hoop styles. Professional hoops vary from driveway goals. Dimensions might differ based on usage. Ensure you note these differences when sketching.
Pay attention also To angles. Accurate angles make drawings realistic. Use references for true representations. Check reallife basketball hoops for inspiration.
Basic Sketching Techniques
Start with simple shapes. Draw a circle for The rim. Use light strokes; make corrections easy. Gradually build your drawing using shapes.
For perspective. Use vanishing points. This technique adds depth. Ensure circles appear as ovals when viewed at angles.
Practice different strokes. Varying pressure creates shading effects. Light sketches help compose final designs. Don’t rush through this process.
Step 1: Outline The Hoop
Begin outlining rim shape. Draw a large circle; this represents main rim. Observe proportions carefully. Left & right sides should mirror each other. Precision here sets foundation for success.
Next. Add thickness. Draw another circle within original one. This thickness represents actual rim’s structure. It adds realism & depth.
Afterward. Focus on angles. Connect circle with straight lines. These lines represent connections between rim & backboard. Accuracy proves crucial at this stage.
Step 2: Adding The Net
Next. Draw net. Use soft. Flowing lines. Visualize how net drapes below The rim. Create wavelike patterns for realism.
Net should hang loosely. Ensure it appears natural in your drawing. Consider how weight affects net’s shape.
Enhance your drawing with shading. Lightly shade areas where net overlaps rim. This detail adds depth & interest.
Step 3: Sketching The Backboard
Now. Draw backboard. Start with rectangular shape behind rim. Make sure it aligns correctly above hoop. Sketch lightly; adjust size if necessary.
You can add details. Like markings. Most backboards have specific dimensions. Research professional court specifications for accuracy.
Incorporate shadows along bottom edge. This technique creates dimension. Depth makes backboard feel present in space.
Final Touches & Details
Review entire drawing. Check proportions & angles. Adjust elements as needed for balance & realism.
Add additional details. Consider background elements; they improve composition. Lightly sketch court’s outline or player silhouettes.
Once satisfied. Outline final sketch in pen. Carefully erase pencil marks. Use colored pencils or markers now for vibrant visuals.
Example Drawings & Inspiration
Explore various drawing styles. Several artists showcase their work online. Check out expert techniques for excellent inspiration.
Visit this great guide for further tips. This resource expands upon techniques discussed above. Providing additional clarity.
You can find inspiration on Pinterest. Discover diverse perspectives & styles from talented artists.
My Personal Experience with Drawing Hoops
Once. I decided To draw a basketball hoop for fun. I followed these exact steps carefully. Surprisingly. I discovered my artwork improved with every attempt. Practice really aids in mastering details.
Comparison Table of Drawing Styles
| Style | Description | Pros | Cons |
|---|---|---|---|
| Realistic 🎨 | Focuses on intricate details. | Highquality representation. | Timeconsuming process. |
| Cartoonish 🖌️ | Stylized version of hoop. | Fun & whimsical feel. | May lack detail. |
| Abstract 🔵 | Expressive & freeform. | Unique interpretation. | Harder for viewers To connect. |
| Minimalistic ✏️ | Focuses on basic shapes. | Easy & quick implementation. | May feel incomplete. |
Where To Showcase Your Artwork
Sharing your art allows for community engagement. Use social media platforms like Instagram. Regularly post your drawings & engage with followers.
Consider joining art groups or forums. Communities often offer constructive feedback. Websites dedicated To art can showcase work effectively.
Explore local art shows or contests. These events provide great opportunities. Networking enhances growth as an artist.
Additional Resources for Drawing
Visit inspiring sites for more help. Many tutorials provide structured guidance. Check out this site for various sports drawing resources.
YouTube offers countless tutorial videos. Visual learning can help solidify skills. Don’t hesitate To explore different instructors.
Books on drawing techniques offer valuable insights. Look for those focusing on sports art. Reading expands knowledge & enhances skills.
What materials do I need To draw a basketball hoop?
To draw a basketball hoop. You’ll need a pencil. Eraser. Ruler. Compass, & colored pencils or markers for coloring.
How do I start drawing The basketball hoop?
Begin by drawing a large rectangle To represent The backboard. Make sure The dimensions are proportionate To how you want The hoop To appear.
What is The next step after The backboard?
After drawing The backboard. Use The compass To draw a circle for The hoop at The appropriate position in front of The backboard.
How do I draw The rim of The basketball hoop?
Inside The circle you just drew. Add a smaller. Parallel circle To create The rim of The hoop.
What size should The basketball hoop be?
A standard basketball hoop has an inner diameter of 18 inches. So make sure your circles reflect this size if you want To draw To scale.
How can I draw The net of The basketball hoop?
To create The net. Draw several curved lines hanging down from The rim. Allowing them To taper towards The bottom.
Should I add details To The backboard?
Yes. You can add details like The paint lines. A square for The shooting target, & texture To make it look more realistic.
What colors should I use for The basketball hoop?
Common colors for basketball hoops are orange for The rim. White for The net, & a dark color for The backboard. Feel free To customize To your preference.
How do I shade The basketball hoop?
Use a darker shade of The base color To add shadows on one side of The backboard & rim To give a threedimensional effect.
Can I add a basketball next To The hoop?
Absolutely! Drawing a basketball near The hoop can enhance your composition & make it more dynamic.
What if I make a mistake while drawing?
If you make a mistake. Simply use an eraser To remove The part you don’t like & redraw it until you are satisfied with The outcome.
How do I finalize my drawing?
Once you are happy with The drawing. Outline it with a fine marker for clarity & erase any pencil marks that are no longer needed.
Can I use digital tools To draw a basketball hoop?
Yes. You can use various digital drawing applications that offer tools To create shapes & add colors easily.
Should I practice drawing basketball hoops?
Practice is essential. The more you draw. The better you’ll become at capturing The proportions & details of a basketball hoop.
How can I find inspiration for my drawing?
You can look for photos of basketball hoops online or visit a local court To observe The hoops in real life for inspiration.
Conclusion
Drawing a basketball hoop is a fun & simple project you can easily tackle, even if you’re a beginner. By following our step-by-step guide, you’ve learned how To create a classic hoop with just a few basic shapes. Remember To take your time & let your creativity shine. Feel free To add your own touches, like a background or a ball, To make it uniquely yours. Don’t hesitate To practice; The more you draw, The better you’ll get! So grab your pencils & have fun bringing your basketball hoop To life! Happy drawing!