

How to Draw a Golf Ball: Step-by-Step Guide for Beginners. Learn how To draw a golf ball with our easy stepbystep guide! Perfect for beginners. This fun tutorial will have you sketching with confidence in no time!
What is How To Draw a Golf Ball: Step-by-Step Guide for Beginners?
A golf ball resembles a small sphere with dimples. Artists often depict that shape using simple techniques. Learning helps develop your drawing skills & understanding of forms.
Brief history of How To Draw a Golf Ball: Step-by-Step Guide for Beginners
Golf balls have undergone many changes. Early balls appeared as wooden or leather spheres. Drawing styles evolved alongside golf ball designs. Reflecting artistic trends.
How To implement How To Draw a Golf Ball: Step-by-Step Guide for Beginners effectively
Begin with basic shapes. Start by drawing a circle for outline. Add dimples evenly around surface for texture. Use light shading for depth. Practice will improve your technique.
Key benefits of using How To Draw a Golf Ball: Step-by-Step Guide for Beginners
Learning this skill enhances creativity. It promotes hand-eye coordination & fine motor skills. Understanding shapes aids in grasping more complex designs. Enjoyment comes alongside progress.
Challenges with How To Draw a Golf Ball: Step-by-Step Guide for Beginners & potential solutions
Many beginners struggle with proportion & detail. Focus on practice helps overcome initial difficulties. Seeking feedback from others can provide new insights. Utilizing references boosts confidence & accuracy.
Future of How To Draw a Golf Ball: Step-by-Step Guide for Beginners
With technology. Digital drawing becomes popular. New tools enhance learning experiences. Social media platforms allow sharing artwork. Community support fosters growth among aspiring artists.
Table of How To Draw a Golf Ball: Step-by-Step Guide for Beginners
| Step | Description |
|---|---|
| 1 | Draw a circle for base shape. |
| 2 | Add dimples using small circles. |
| 3 | Apply shading for depth. |
| 4 | Finalize details & refine edges. |
| 5 | Review & adjust as needed. |

Understanding Basic Shapes
Drawing a golf ball starts with understanding basic shapes. Begin with a simple circle. A round shape will serve as a foundation. This circle represents outer boundary of golf ball.
Ensure proportions remain accurate while making this circle. Use a compass. Or trace around a round object for precision. This method enhances overall appearance of your later drawing.
For more visual guidance. Refer here. Watching a drawing tutorial may provide you with essential techniques. Follow along To ensure you grasp each step correctly.
Gather Necessary Materials
Collecting appropriate materials enhances your drawing experience. Use good quality sketch paper. This allows better pencil or pen impressions.
Select tools based on comfort. Pencils. Fine liners. Or markers work well for drawing. Each tool provides varying effects. Adding depth & contrast.
Visit this resource for further insights. Highlights include optimal tools suited for beginners. Gaining understanding about supplies can streamline your workflow.
Positioning Your Circle
Finding perfect position for your circle matters. Center placement allows balance in drawing. Adjust coordinates by measuring equal spacing from edges of your paper.
Consider using light pencil strokes at this stage. Light lines can help adjust if needed. Once satisfied with positioning. Reinforce circle outline boldly.
Use erasers wisely. Clearing unwanted marks ensures cleaner final art. A clear canvas will improve overall professionalism of your drawing.
Adding Texture To Shape
Texture plays an essential role in creating realistic golf balls. Utilize small. Curved lines across surface of circle. This simulates dimples found on an actual golf ball.
Consistent spacing between these lines enhances realism. Observe images of golf balls for reference. Noticing differences in patterns will improve your drawing quality.
Consider varying line pressure too. Lighter strokes simulate shallower dimples. Heavier strokes suggest deeper impressions. Making golf ball look more threedimensional.
Incorporating Shading Techniques
Shading adds depth & dimension To drawing. Determine light source direction before starting. This understanding will influence where shadows fall on golf ball.
Use softer pencils for shading. This will create smoother transitions between light & dark areas. Gradually build these shadows for a more realistic effect.
Practice blending techniques. Use blending stumps or your finger. Achieving seamless gradients will elevate your drawing’s professionalism significantly.
Detailing with Highlights
Details enhance depth in golf ball representation. Use white ink or a white gel pen for highlights. Focus on areas facing your light source.
Strategically placing highlights gives illusion of shine. Experiment with different intensity levels for highlights. This will provide you with varied finishes.
A good balance of light & shadow creates visual harmony. Ensure highlights are subtle yet noticeable. This technique will convey a polished look.
Final Touches for Realism
Make necessary adjustments after reviewing your drawing. Check proportions. Textures, & shading. Small tweaks can significantly change overall appearance.
Consider adding background elements. Subtle grass or golf tee visuals can enhance viewer impact. Background context helps convey purpose of your drawing.
Final touches should reflect your personal style. Embrace imperfection as part of learning process. Each unique mark tells a story about your growth & development.
Exploring Different Drawing Styles
Experimenting with styles can enhance creativity. Consider drawing a golf ball using simple cartoon techniques. A playful interpretation can appeal To a wider audience.
Contrast this with realistic styles. Focus on observing dimensions & textures precisely. Challenge yourself with both approaches for diverse skill development.
Gather inspiration from various artists. Analyzing different styles can expand your artistic vision. Each artist may offer unique perspectives worthy of exploration.
Learning from Mistakes
Mistakes are natural & valuable for growth. Embrace them as opportunities for learning. Analyzing errors can deepen understanding of drawing techniques.
Document your drawing process. Taking pictures allows you To review progress over time. Identifying previous mistakes can prevent repetitions in future artwork.
Remember. Consistency remains key. Continued practice leads towards improvement. Each drawing reinforces learned concepts & skills.
Joining Drawing Communities
Engaging with drawing communities fosters growth. Online platforms provide support & constructive feedback. Sharing your work can boost confidence while inspiring others.
Participate in art challenges. They motivate you To try new techniques & styles. Community feedback can enhance your learning experience significantly.
Consider local drawing groups too. Connecting with fellow artists sparks collaboration & exchanges. You may discover new perspectives through discussions & shared experiences.
Expanding Artistic Skills
Your golf ball drawing journey can open doors To new skills. Experiment with multiple angles & views. Understanding different perspectives adds depth To your artistic repertoire.
Consider diversifying subjects. Drawing various objects sharpens skills. Apply consistent techniques across different projects for comprehensive growth.
Seek educational resources frequently. Online tutorials. Books, & workshops enhance understanding of artistic principles. Committing To learning will yield significant results.
Incorporating Digital Techniques
Digital drawing can present exciting avenues. Familiarize with software tailored for drawing. Comicrelated applications can simulate various pencil & brush effects.
Experiment with layering techniques in digital programs. This feature allows for more intricate details. Gradual blending techniques can create stunning visuals.
Digital platforms often allow for easy adjustments. Retouching & refining parts are simpler than traditional methods. Embrace technology as a complementary tool for your art.
Reflecting on Artistic Journey
Your artistic exploration signifies personal growth. Observing your transformations cultivates a sense of achievement. Celebrate each completed piece as a testament To your hard work.
Regularly reflecting on progress helps maintain motivation. Establish measurable goals in your artistic practice. This sets a framework for continuous development.
Consider keeping an art journal. Documenting thoughts. Ideas, & techniques enhances understanding. This practice contributes positively towards your overall learning experience.
Feature Highlights
- Stepbystep illustrations for guidance 🎨
- Multiple drawing techniques explored 🖌️
- Focus on texture & shading 🌓
- Advice from experienced artists 👩🎨
- Diverse style experimentation encouraged ✨
- Opportunities for community engagement 🤝
- Resources for further learning 📚
Encouraging Your Creativity
Your creativity reveals itself through artistic endeavors. Encourage curiosity by practicing regularly. New techniques await discovery with each drawing session.
Explore various inspirations. Nature. Sports, & everyday items can spark new ideas. Remaining openminded allows your creativity To flourish.
Facing challenges headon builds resilience. Each completed drawing reflects your determination & passion. Trust artistic process while pursuing your skills.

Understanding Golf Ball Design
Golf balls have specific features. A standard golf ball consists of an outer cover. A core, & dimples. Each component contributes uniquely. Designers aim for optimal performance during a game. Dimples create lift while reducing drag. This balance ensures better flight. Consequently. Understanding these aspects helps in drawing a golf ball.
When sketching. Start with basic shapes. A circular outline serves as a foundation. This circular shape represents a golf ball’s overall form. Next. Add texture To simulate dimples. A series of small. Evenly spaced circles enhances The realistic effect. Aim for uniformity in placement for authenticity. Each dimple influences light reflection in sketches. This subtle detail can elevate an illustration.
Color plays a role too. Golf balls come in various hues. White remains traditional. While bright colors enhance visibility. Consider using shades that contrast against backgrounds. This choice improves drawing clarity. Bright colors captivate attention. Thus. Selecting appropriate colors enhances artistic expression.
Gathering Necessary Drawing Tools
Before starting. Gather essential tools. These include pencils. Paper, & erasers. Each tool serves a specific purpose in sketching. A sharp pencil produces clean lines. Soft pencils allow for shading. Creating depth in drawings. Finetipped markers offer defined outlines. Choosing quality materials can enhance results significantly.
Sketching paper also matters. Select smooth. Highquality paper for intricate details. Rough paper may hinder precision. Experimentation with different weights presents diverse effects. Practice helps determine your preferred type. Ultimately. Each element contributes toward achieving desired outcomes.
Digital tools are an option as well. Programs like Procreate or Adobe Illustrator provide flexibility. They offer various brushes & effects not achievable on paper. Using digital tools can expedite certain processes. Explore different applications To identify personal preferences. Many artists find digital mediums complement traditional methods effectively.
StepbyStep Guide on Drawing a Golf Ball
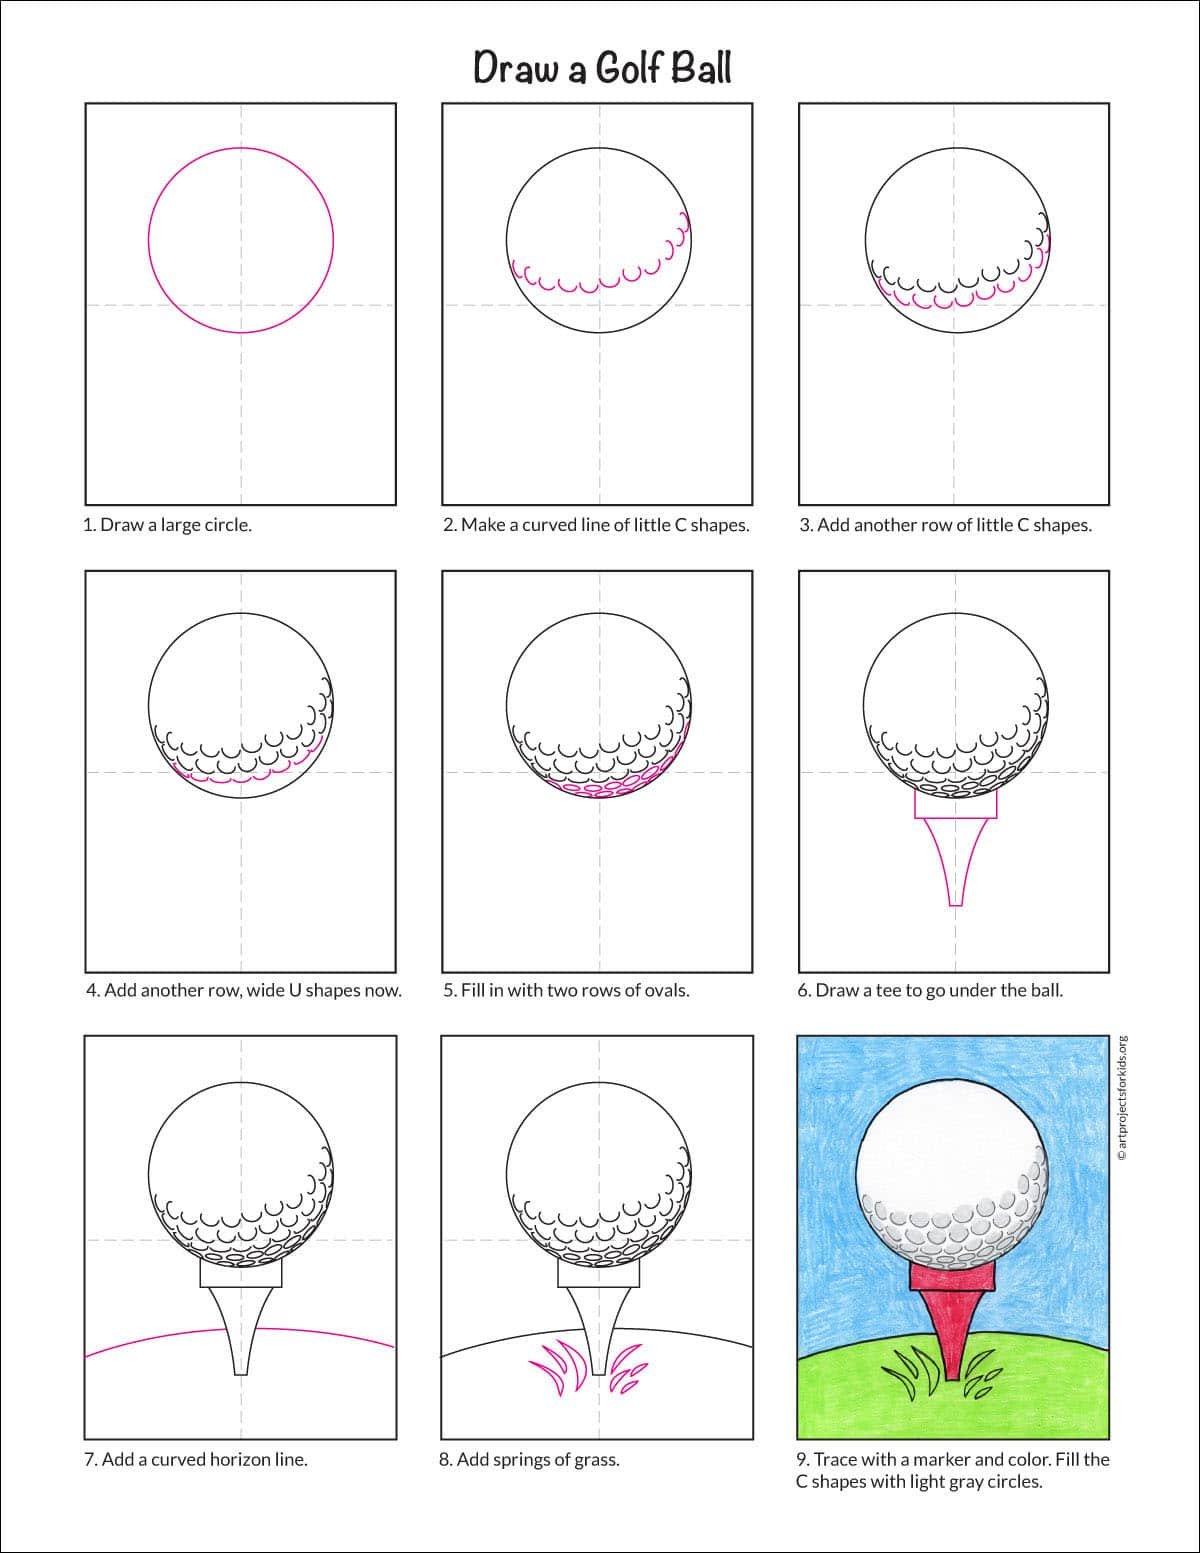
Begin your drawing with a circle. This marks your foundational shape. Use a compass or trace a circular object for precision. Once an outline appears. Ensure proportions remain consistent. An uneven shape detracts from realism. After securing a clean base. Proceed with detailing.
Next. Add dimples around your ball. Use small circles. Varying sizes, & placements evenly. This pattern replicates an authentic golf ball. Pay attention To spacing—try maintaining consistency throughout. Consider lightly sketching dimensional layering To capture shadows. This step enhances depth & a threedimensional illusion. If you seek guidance. Check out this helpful video for a visual reference.
Now. Introduce The color palette. Begin with a primary hue; use white for traditional golf balls. Softly blend shadows along The edges. Choose brighter accents To contrast shadows. Creating depth. For a finished look. Add highlights using an eraser for a shiny effect. Incorporate unique colors for creative expression. Showcasing personality in your work.
Finalizing Your Drawing
In this final step. Review your piece. Check for symmetry & detail. Fix any inconsistencies in shapes or colors. A polished look improves overall presentation. Erasers can assist in refining edges. Make sure no lingering pencil lines distract from your main subject.
Consider enhancing contrast for visual appeal. Darkening shadows emphasizes depth effectively. This technique brings a threedimensional quality. Stand back occasionally. Viewing from a distance for perspective. Such practices often reveal hidden imperfections. Adjust as necessary until satisfied.
Lastly. Showcase your work. Select an appropriate frame or presentation technique. Sharing online invites constructive feedback. This interaction can foster growth as an artist. Engagement with other creators enriches experiences. Continue practicing regularly To refine skills further.
Comparative Analysis of Different Techniques
| Technique Method | Traditional Drawing 🎨 | Digital Drawing 💻 |
|---|---|---|
| Materials Needed | Pencil. Paper. Eraser | Tablet. Software. Stylus |
| Level of Detail | High with patience | Unlimited options |
| Correction Ability | Limited; requires erasing | Easy; can undo actions |
| Learning Curve | Basic skills needed | Software familiarity important |
| Final Output | Physical artwork | Digital file; easy sharing |
Enhancing Skills with Practice
Frequent practice makes improvement noticeable. Set aside time regularly for sketching. Cold days outside offer opportunities for indoor drawing sessions. Incorporate elements from various sources for enhancement. Experimenting with different designs fosters creativity. Try involving textures & other shapes. Not just golf balls.
A previous experience also proves beneficial. I used inconsistent techniques at first. But gradually. My drawing transformed remarkably. By practicing regularly. Confidence grew. Leading To enhanced skills. Showcasing work online opened interactions & exchange with fellow artists.
Seek inspiration from artists you admire. Studying differing styles can provide new ideas. Understand their techniques; apply them toward your unique expressions. Consider joining art communities or forums for further dialogue. Sharing experiences & receiving feedback nurtures growth as a creator.
Resources for Further Learning
Many resources are available online. Websites offer tutorials. Articles, & videos. Consider exploring sites dedicated exclusively To drawing lessons. Check popular platforms featuring stepbystep guides. Each resource contributes valuable insights into technique & style.
Engaging with fellow artists enhances learning. Online forums & social media groups foster connections. Share artwork. Ask questions, & receive constructive advice. Discussions around art can provide various perspectives enriching your understanding.
For golf enthusiasts. This comprehensive guide enhances learning about golf gear. Understanding equipment often influences art representing sports. Thus. This connection is vital for portraying authentic experiences.
For history lovers. Check out this sports history site. Digging into sports backgrounds offers valuable context. Enhancing overall art brings added depth through researched knowledge. Learning diversifies influences in artistic expressions significantly.
What materials do I need To draw a golf ball?
To draw a golf ball. You will need a sketchbook or drawing paper. Pencils for sketching & shading. An eraser, & colored pencils or markers for adding details.
How do I start drawing a golf ball?
Begin by lightly sketching a perfect circle To represent The shape of The golf ball. Use a compass or trace around a circular object for precision.
What techniques can I use To create texture on The golf ball?
To create texture. You can draw small dimples across The surface. Use a stippling technique or small circular motions with your pencil To mimic The ball’s texture.
How can I make The golf ball look threedimensional?
Add shading To one side of The ball To create The illusion of depth. Choose a light source direction & shade The opposite side accordingly.
Should I include shadows when drawing The golf ball?
Yes. Adding a shadow beneath The golf ball can enhance its threedimensional effect. Create a soft. Rounded shadow To match The light source.
How do I add color To my drawing?
You can use colored pencils or markers To add color. Typically. Golf balls are white. But you can add slight shading of gray or blue To give it dimension.
What should I consider when choosing The background?
Consider using a simple background such as grass or a golf course setting To keep The focus on The golf ball. A subtle gradient can work well. Too.
How do I erase without damaging my drawing?
Use a soft eraser & gently lift The pencil marks instead of rubbing hard. This helps avoid tearing The paper & preserves your drawing.
Can I add a logo or text on The golf ball?
Yes. You can add a logo or text by sketching it lightly before finalizing with darker lines. Keep it small & proportional To The ball.
What common mistakes should I avoid while drawing?
Avoid pressing too hard with your pencil when sketching. As it can make erasing difficult. Also. Ensure The dimples are evenly spaced for a realistic look.
How do I know if my drawing looks good?
Take a break & revisit your drawing with fresh eyes. Compare it with reference images To ensure you have captured The details accurately.
What if I make mistakes during The drawing process?
Mistakes are part of The drawing process. Use your eraser To fix them. Or embrace The imperfections as part of your unique style.
Should I practice drawing golf balls before attempting a final piece?
Practicing on scrap paper can help you refine your technique & build confidence before working on your final piece.
How can I improve my drawing skills over time?
Continuous practice is key. Try drawing different types of golf balls & experiment with various techniques To enhance your skills.
Where can I find additional resources for drawing?
Look for online tutorials. Art books, & instructional videos that focus on drawing techniques To further improve your understanding & skills.
Conclusion
Drawing a golf ball can be a fun & rewarding experience, especially for beginners. By following these simple steps, you’re not just learning To sketch; you’re also tapping into your creativity. Remember To keep it light & enjoyable, allowing your personal style To shine through. Practice makes perfect, so don’t be discouraged if your first attempts aren’t exactly what you envisioned. With patience & practice, you’ll soon master The art of drawing a golf ball. So grab your pencil & paper, & start sketching today! Happy drawing!