

How to Draw Basketball: Step-by-Step Guide. Learn how To draw a basketball with our easy stepbystep guide! Fun tips & tricks make it simple for everyone. Whether you’re a beginner or a pro.
What is How To Draw Basketball: Step-by-Step Guide & how does it work?
Drawing basketball involves creating a visual representation of basketball. This process includes understanding basic shapes. Skill development focuses on form & proportions. Artists often start with outlines before adding details. Techniques vary based on style preference.
Brief history of How To Draw Basketball: Step-by-Step Guide
Basketball drawing gained traction when sport became popular. Artists began exploring different drawing styles over years. Initially. Sketches focused on dynamics of game. Gradually more complex illustrations evolved. Reflecting movement & action. Influences from graphic novels stimulated creativity among artists.
How To implement How To Draw Basketball: Step-by-Step Guide effectively
Implementing basketball drawing techniques requires practice & patience. Begin with simple shapes like circles & ovals. Gradually refine outlines. Emphasizing key features. Include details like lines & textures for realism. Regular practice enhances skills & builds confidence.
Key benefits of using How To Draw Basketball: Step-by-Step Guide
Creating basketball drawings offers numerous benefits. Enhances creativity & artistic expression. Improves observation skills through careful examination of forms. Builds confidence as artists see progression. Provides a fun activity for enthusiasts of all ages.
Challenges with How To Draw Basketball: Step-by-Step Guide & potential solutions
Challenges may arise when drawing basketball scenes. Some individuals struggle with proportions & perspective. Utilizing reference images can help overcome these issues. Seeking feedback from peers can enhance techniques. Experimenting with different materials aids in discovering personal style.
Future of How To Draw Basketball: Step-by-Step Guide
As technology advances. Drawing methods continue evolving. Digital tools offer new ways for artists. Virtual classes provide global access To learning resources. Interactive platforms encourage community engagement for aspiring artists. Future trends highlight innovative approaches in art education.
Table of How To Draw Basketball: Step-by-Step Guide
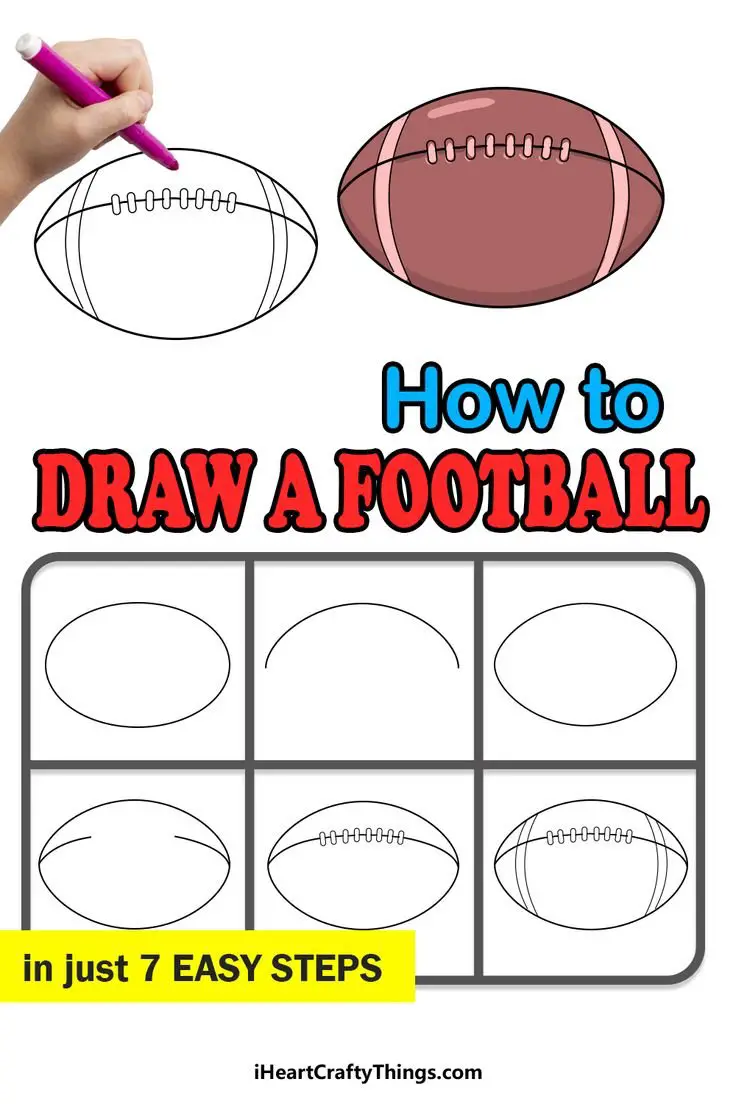
| Step | Description |
|---|---|
| 1 | Sketch basic shape of basketball. |
| 2 | Add guide lines for detail placement. |
| 3 | Refine shape. Ensuring smooth curves. |
| 4 | Create texture & detail on basketball. |
| 5 | Ink outlines for a polished finish. |
| 6 | Color basketball using preferred media. |

Materials Needed for Drawing Basketball
When preparing for your drawing journey. Ensure you have essential materials. Quality supplies enhance creativity & outcome significantly. A sketchbook offers a perfect canvas for your artwork. Consider using a pencil for initial sketches. Allowing for easy adjustments. Markers or colored pencils add vibrancy later in your drawing process.
Other supplies may include an eraser for corrections & finetipped pens for outlining. These elements help bring your vision To life. If you’re interested in additional tips. Feel free To check this video tutorial that complements this guide. Familiarizing yourself with various materials boosts confidence & skill.
Having a comfortable workspace enhances focus as well. Gather all essentials beforehand. This organized approach saves time during drawing sessions. Experimenting with different materials allows you now To discover personal preferences. Leading To enjoyable experiences.
Understanding Basketball Structure
Properly observing a basketball brings forth an understanding of its structure. A basketball’s shape resembles a sphere. With subtle details enhancing realism. Familiarize yourself with these characteristics before starting your drawing. Recognizing proportions helps create an accurate depiction.
Pay attention now To The unique texture of basketballs. Its surface has a distinct pattern of grooves. Providing grip during play. Observing these features closely adds authenticity To your artwork. Gradually. Your ability now To capture such nuances will improve.
Additionally. Familiarize yourself with basketball equipment. Including hoops & nets. Understanding how these aspects interact in a game can inspire creativity. Exploring various angles & perspectives adds depth. Intrigue, & visual interest To your work.
Sketching Basic Shapes
Your first step towards drawing involves creating basic shapes. Start with an outline of a circle. This will represent your basketball’s body. Using light pencil strokes allows for easy adjustments. Ensure proportions remain consistent as you progress.
Next. Draw a slightly flattened circle underneath. This represents The basketball court or ground. Given this foundational structure. Additional details will follow. Maintaining balance during these early stages sets a solid foundation.
Refer To this helpful resource for insights into basic shape sketching. This guide assists in understanding The importance of proportion. Following these steps sets up for a successful final drawing.
Defining The Basketball Lines
Once basic shapes are in place. Begin defining lines. Start with two curved lines across your circle. These lines emulate The ball’s seams. Ensure curves remain smooth & naturallooking. Such details are vital in creating a realistic look.
Add another set of lines. Intersecting previous ones. While maintaining symmetry. Make adjustments where necessary. Visualizing how these features mimic a real basketball enhances accuracy. Focus on smooth transitions between lines. This attention To detail greatly impacts overall appearance.
Maintaining even pressure on your pencil guarantees consistent line thickness. Experiment with different styles as well. Such as dotted or dashed lines. Such variations provide opportunities for creativity while sticking To traditional basketball characteristics.
Adding Texture & Depth
To enhance your drawing. Adding texture becomes crucial. Start with shading techniques that mimic a basketball’s surface. Darkening specific areas adds depth & dimension. Consider where light hits The ball. This perspective influences shadows. Enhancing realism.
For added texture. Experiment with crosshatching or stippling techniques. Gradually build layers of shading for a more threedimensional appearance. Practice different approaches until comfortable finding what works best for you. Remember that individual style shines through in these finishing touches.
Additionally. Highlighting certain sections of The ball can create a reflective quality. Utilize lighter pencil strokes around The highlights. These techniques contribute significantly now To your overall basketball drawing. Ultimately. It’s this duality of light & shadow that brings your drawing To life.
Incorporating The Backdrop
Creating a backdrop adds context To your basketball drawing. Visualize various environments. Such as a court or outdoor setting. Consider The significance of your chosen background & how it interacts with The ball. A welldesigned backdrop enhances focus on basketball while adding depth.
Start sketching a simple court outline To accompany your drawing. Including a hoop. Net. Or backboard enriches perspective. Additionally. Adding players or spectators can contribute authentic atmosphere. Balance between background elements & primary subject is key.
Keep background details subtle so they complement rather than distract. Such thoughtfulness ensures your basketball remains The focal point. Practicing these techniques regularly enhances ability & variability in art skills. Over time. Backgrounds will feel more natural & cohesive.
Using Color for Enhanced Detail
Incorporating color elevates your basketball drawing To new heights. Select colors that accurately represent a basketball. Typical hues include orange. Black. Or white for seams. Choose shades based on personal preference & inspiration. Attention now To detail in coloring significantly enhances overall appearance.
Utilizing colored pencils or markers allows for diverse techniques. Blending colors helps create soft transitions for realistic effect. Darker hues provide depth. While lighter shades can reflect light. Experimentation remains fundamental in developing personal style.
Consider enhancing realism further by adding reflections or highlights. Utilize white or lighter colors on specific sections. This layer adds dynamic quality To your work. Playing with various coloring techniques fosters creativity. Ultimately producing a unique piece.
Finalizing The Drawing
Once all elements come together. Review your work for completeness. Check that proportions remain consistent & lines smooth. Make any necessary adjustments or enhancements now To improve overall impact. Final touches may include enhancing shadows or highlights again for refinement.
After ensuring satisfaction with your artwork. Consider outlining with a finetipped pen. This enhances definition while creating professional appearance. Be cautious. However; ink doesn’t erase easily. Take your time & work carefully during this stage.
Signing your drawing adds a personal touch. Consider placing your signature subtly within a corner. This final step represents your investment & acknowledges hard work. Stepping back. Reflect on your progress & experience. Celebrate this journey of creativity & exploration.
Practicing Regularly
Regular practice develops skill significantly over time. Set aside time daily or weekly dedicated just for drawing. Consistency enhances comfort & ability. Allowing for exploration of various styles. Observe & replicate different basketball drawings for additional learning opportunities.
Experimentation with different techniques can yield surprising results. Explore diverse textures. Colors. Or perspectives. Such variety keeps The drawing process fresh & enjoyable. Over time. You’ll notice improvement in your skill set. Fostering a deeper appreciation for art.
Document progress by saving previous drawings. Comparing early work with recent pieces showcases advancement. Each drawing reflects growth. Highlighting unique choices & newfound skills. This practice fosters motivation & inspires further exploration.
Joining Drawing Communities
Finding support within drawing communities cultivates growth & confidence. Participate in local art classes. Workshops. Or online forums. Engaging with fellow artists introduces you now To diverse perspectives & techniques. Sharing artwork fosters constructive feedback. Prompting improvement.
Utilize social media platforms for promoting artwork & connecting. Build a portfolio showcasing growth & variety. Engaging with a vibrant community creates opportunities for collaboration & inspiration. Learning by observing others can spark new ideas.
Stay openminded about receiving critiques. Constructive feedback provides valuable insights. Embracing suggestions often leads To unexpected & rewarding outcomes. This journey remains as much about personal growth as it does connecting with others.
Exploring Different Styles
Experimenting with different art styles promotes personal growth. Explore unconventional approaches alongside traditional ones. Observing artists with varying techniques allows you now To develop unique expressions. Trying out cartoon styles or abstract representations can inspire creativity.
Create several versions of your basketball drawing. Each piece can highlight varying techniques or colors. Eventually. You might favor a particular style or blend several aspects. This experimentation challenges assumptions while encouraging exploration.
Remember that your diverse experiences contribute unique perspectives. Art thrives on creativity. Inspiration, & imagination. Engage fiercely with your drawing process. Knowing this journey will unfold uniquely for you.
Learning from Professional Artists
Studying professional artists offers valuable insights into technique & style. Examine their approach for creating captivating basketball artwork. Analyzing shape. Line, & color utilization provides a deeper understanding. Consider seeking out drawing tutorials or courses offered by established artists.
Many professional artists share tips through a variety of platforms. Observing their processes influences technique & creativity. Integrating newfound knowledge into personal practice enriches understanding & artistic voice. Visit galleries or exhibitions To examine works in person as well.
Absorbing techniques & perspectives from various sources enhances versatility. This continual learning journey fosters growth & exploration. Each artist’s influence contributes To your personal style’s evolution. Embrace this opportunity for selfdiscovery through art.
Documenting Your Journey
Maintaining a drawing journal documents growth & creative exploration. Include sketches. Thoughts. Or challenges encountered along your journey. This diary serves as a personal archive reflecting your artistic evolution. Regularly revisiting these entries invites meaningful reflection.
Consider adding your favorite techniques or discoveries within this journal. This practice provides clarity & nurtures inspiration for future work. Acknowledging obstacles faced leads To personal growth. Ultimately fostering resilience.
Encourage others To embark on their own creative journeys. Share your insights or reflections. Helping foster a supportive community. Together. Individuals create pathways for growth through collaboration & shared experiences. Documenting these elements creates bonds through artistry.
Incorporating Sports Themes
Infusing sports themes into your artwork broadens artistic expression. Consider drawing basketball players or iconic moments. Capturing movement adds dynamic quality. Enriching your artistic journey. This approach strengthens skills while celebrating sports culture.
Explore how basketball intersects with various themes. Choose elements of teamwork. Competition. Or personal perseverance as inspiration. Finding personal connections To sport can add emotional depth. Engaging with these themes invites additional narratives into your practice.
Utilizing mixed media can enhance themes further. Combine techniques such as painting. Digital art. Or collage. This exploration fosters personal expression while maintaining still a focus on basketball. Experimenting allows each piece To emerge uniquely.
Understanding Basic Shapes
Basketball drawing starts with basic geometric shapes. Begin with a circle for your ball. This will represent basketball’s round form. Next. Visualize a horizontal oval extending from this circle. This oval will represent perspective. Lines intersecting within these shapes create depth.
Focusing on proportions helps maintain balance. Equally spaced lines ensure accuracy. Practice helps in mastering your craft. Consider practicing these shapes multiple times. This will build muscle memory. Important for effective sketching.
After grasping basic shapes. Recognize their importance. Everything stems from these twodimension forms. Building upon these shapes fosters creativity. Use these skills for other drawings as well. You’ll find this approach beneficial in various aspects of art.
Adding Details
Details truly bring drawings alive. Start by adding small lines across your basketball. These lines represent its surface texture. Include subtle curves To show light. This will create contrast. Pay close attention To shadows. As they help depict depth.
Explore tutorials for additional techniques. One useful resource can be found here: How To Draw a Basketball. Different styles allow for flexibility in your art. Experiment with different shading methods for unique effects.
Another helpful resource lies within community platforms. You can discover vibrant discussions about painting & techniques. Check out this thread: Mural Tutorial Guide. Engaging with other artists helps improve skills. Learning from varied perspectives enriches everyone’s artistic journey.
Creating Dynamics
Dynamic action breathes life into your drawings. Add movement by angling basketball. Images of dribbling. Passing, & shooting can inspire composition. Use lines To show motion around The ball. Curved lines suggest movement direction.
Study existing artwork for movement inspiration. Artists often depict scenes in ways that capture energy. Look closely at professional sports illustrations. Understanding professional techniques can sharpen your skills.
Try adding players around your ball. Convey emotions through body language. Featuring facial expressions adds an engaging element. A sense of urgency can inspire excitement in your work.
Coloring & Shading Techniques
Choosing The right colors enhances visual appeal. Traditional basketball colors stand out. Common colors include orange. Brown, & black. Use contrasting shades for artwork depth. Select coloring materials carefully depending on your style.
Bear in mind that shading isn’t limited To pencils. Markers or digital tools yield dynamic results. Experimenting with layers enables visibility variations. Explore different color blending techniques To achieve desired results.
Practice various shading techniques often. This will ensure fine control over your medium. Gradually progress towards more complex methods. Diversifying shading styles expands your artistic range.
Comparing Different Styles
| Style | Technique | Effect | Difficulty | Tools |
|---|---|---|---|---|
| Realistic 🎨 | Detailed shading | High depth | Hard | Pencils. Pastels |
| Cartoon 🖍️ | Simplified lines | Fun appeal | Easy | Markers. Digital tools |
| Abstract 🖼️ | Color splashes | Creative expression | Variable | Acrylics. Watercolors |
| Monochromatic 🖤 | Single color play | Unique aesthetic | Medium | Pencils. Inks |
Practicing Regularly
Frequent practice remains essential for improvement. Select specific areas for focus during each session. Dedicate time each week for basketballfocused sketches. Over time. Skills increase considerably.
Document progress by saving your drawings. Reflecting back offers insight into growth. Daily drawing enhances creativity & builds discipline. Set aside a consistent timeframe for your art.
Art communities often encourage regular engagement. Joining a local group enhances exposure. Share artwork for constructive criticism & feedback. Collaboration offers new perspectives. Emphasizing learning.
My Personal Experience
Throughout my journey. I drew many basketballs. Each attempt improved my skills. Experimentation led me down exciting paths. Learning diverse techniques allowed me creativity.
What materials do I need To draw a basketball?
To draw a basketball. You will need a pencil. Eraser. Paper, & coloring materials such as markers or colored pencils in orange & black.
How do I start drawing a basketball?
Begin by drawing a circle To represent The shape of The basketball. It doesn’t have To be perfect. As basketballs have a slightly inflated look.
What is The correct way To outline The basketball?
Once you have your circle. Outline it lightly with a pencil until you are satisfied with The shape. This will serve as The base for adding details.
How do I add The lines on The basketball?
Draw a vertical line that curves slightly from The top To The bottom of The circle. Then. Add a horizontal line that also curves & intersects The first line. Creating a cross pattern typical of a basketball.
What is The best way To shade The basketball?
To add depth. Lightly shade one side of The basketball with a pencil. This gives The illusion of light & shadow. Making it look more threedimensional.
Should I use color when drawing a basketball?
Yes. Once The outlines & shading are done. Use orange for The main body & black for The lines To illustrate a realistic basketball.
How can I make my basketball drawing look more realistic?
To enhance realism. Pay attention To The shading by darkening The areas opposite The light source & adjusting your line thickness To mimic The actual lines on a basketball.
What size should I draw my basketball?
The size can vary based on your preference. But typically. A basketball is drawn large enough To fill a significant portion of The page while leaving space for details.
Do I need To erase any lines after outlining?
Yes. After you are satisfied with The outlines & details. Gently erase any unnecessary guidelines To make your drawing cleaner.
Can I add additional details To my basketball drawing?
Absolutely! You can add highlights To The surface using a white colored pencil or gel pen To give it a shiny appearance. Simulating light reflection.
Is it okay To draw a basketball in a different color?
While traditional basketballs are orange. You can use any color you like To express creativity. Feel free To experiment!
How long does it take To draw a basketball?
The time taken can vary. But a simple drawing could take about 15 To 30 minutes. Depending on The level of detail you wish To include.
Should I practice drawing basketballs before doing a final piece?
Yes. Practicing several times can help improve your technique & confidence. Allowing you To create a final piece that you’re proud of.
Can I draw a basketball in motion?
Yes. Capturing a basketball in motion can add excitement To your drawing. Use lines & motion effects To convey movement.
Where can I find inspiration for drawing a basketball?
You can find inspiration in sports magazines. Online images. Or even watching a basketball game To see how they look in different angles & lighting.
Conclusion
In conclusion, drawing a basketball can be fun & easy if you follow The steps outlined in this guide. Remember To start with simple shapes & gradually add details. Don’t worry if your first try isn’t perfect; practice makes progress! Keep a pencil & paper handy, & let your creativity flow. Whether you’re sketching for fun or To improve your skills, The key is To enjoy The process. So grab your art supplies, maybe even some inspiration from your favorite players, & start drawing. With a little patience, you’ll be creating amazing basketball drawings in no time!