

Tennis Drawing: Step-by-Step Guide for Beginners. Unleash your creativity with our easy Tennis Drawing guide! Perfect for beginners. This stepbystep tutorial makes drawing fun & simple. Join in today!
What is Tennis Drawing: Step-by-Step Guide for Beginners & how does it work?
Tennis drawing focuses on visualizing techniques related To tennis. This method helps beginners understand strokes & strategies better. By forming images. Learners enhance their skills significantly. Using a pencil & paper. Individuals can depict various tennis scenarios. This process aids in grasping fundamental mechanics behind each move.
Brief history of Tennis Drawing: Step-by-Step Guide for Beginners
Tennis drawing evolved over decades. Early enthusiasts created sketches of players in action. Art captured techniques practiced on courts. As interest grew. Tennis diagrams became popular among coaches & instructors. Over time. Innovative methods emerged. Incorporating technology in illustrating concepts.
How To implement Tennis Drawing: Step-by-Step Guide for Beginners effectively
Begin by choosing a comfortable workspace. Gather necessary materials such as paper & pencils. Start with basic strokes like forehands & backhands. Focus on key positions of players during strokes. Gradually progress towards more complex movements. Highlighting footwork & stance. Consistent practice leads To improvement in understanding.
Key benefits of using Tennis Drawing: Step-by-Step Guide for Beginners
This technique enhances retention of strategies. Visual representation simplifies learning complex shots. Beginners can clear confusion surrounding different strokes. Furthermore. This method promotes creativity in training routines. A visual aid streamlines communication among players & coaches.
Challenges with Tennis Drawing: Step-by-Step Guide for Beginners & potential solutions
Beginners might face difficulties with sketching accuracy. Poor proportions may lead To misinterpretation. Practicing basic shapes can correct this issue. Additionally. Lack of inspiration might hinder creativity. Seeking reference images from professionals can offer motivation while drawing.
Future of Tennis Drawing: Step-by-Step Guide for Beginners
As technology advances. Tennis drawing may integrate digital tools. Software programs could enhance drawing accuracy & detail. Virtual reality applications might allow immersive experiences for learners. Future trends will likely see collaborative platforms enabling real-time drawing alongside coaching sessions.
Table of Tennis Drawing: Step-by-Step Guide for Beginners
Below. Find a simplified table summarizing key elements:
| Element | Description |
|---|---|
| Workspace | A designated area for drawing. |
| Materials | Pencil. Paper. Erasers. References. |
| Basic Strokes | Forehand. Backhand. Serve. |
| Advanced Techniques | Footwork. Positioning. Shot variations. |

Tennis Drawing Overview
Tennis drawing offers a unique blend of sports & artistry. Many beginners find joy in portraying their love for this sport through art. By capturing players. Racquets, & action. One can create vibrant tennis scenes. With practice. Anyone can develop their skills in this enjoyable hobby. Tennis drawing not only enhances artistic abilities but also fosters a deeper appreciation for this dynamic game.
For those looking for visual guidance. A helpful resource can be found here. Watching tutorials can inspire creativity & improve techniques. Emulating skilled artists helps beginners understand proportions & shading that bring drawings To life. Every stroke of pencil aids in mastering intricate details that characterize tennis.
Moreover. Looking at reference images plays a pivotal role. They serve as guidelines for capturing movement & posture accurately. Analyzing various poses allows one To depict emotions effectively. Tennis’s dynamic nature influences how players look during critical moments.
Essential Materials for Tennis Drawing
Beginning any drawing journey requires specific materials. These tools enhance quality while making process more enjoyable. Highquality pencils. Erasers. Paper, & additional supplies will elevate results.
Sketching pencils come in various grades. Starting with a HB pencil is recommended for rough outlines. As detail becomes necessary. Shifting towards softer pencils like 2B or 4B aids in shading. Sharpening these tools consistently maintains precision during drawing.
Choosing appropriate paper is equally vital. Smooth sketch paper caters To pencil drawings. While textured paper enhances shading effects. Every paper type influences final outcomes significantly.
Understanding Basic Shapes in Tennis Drawing
All drawings begin with fundamental shapes. Recognizing these shapes lays a strong foundation for more complex figures. Players often resemble combinations of circles. Ovals, & rectangles. Starting with basic geometric forms streamlines initial steps.
Focus on outlining players’ heads using circles. Ovals work great for bodies. While rectangles illustrate arms & legs. By mastering these techniques. Understanding proportions becomes easier over time. Each shape can be refined later as details emerge.
Practicing shape formation helps simplify complex drawings. Continuous practice builds confidence in structuring figures. Artists create a framework with basic shapes. Ultimately leading To impressive final pieces.
Capturing Movement & Action
Tennis thrives on movement. Making dynamic poses essential. Observing real players during matches aids in capturing energy on paper. Each stroke should reflect action. Creating a sense of excitement.
Studying references makes a considerable impact. Photographs display pivotal moments like serves or volleys. Artists can analyze players’ stances. Racket placements, & footwork through these references. Memorizing key points will enhance drawing processes.
Experimenting with lines also influences action portrayal. Using swift. Flowing lines conveys speed & agility effectively. Tension between players’ muscles adds realism. Making sketches more captivating To viewers.
StepbyStep Guide: Outlining a Tennis Player
Beginning with basic shapes creates an excellent outline. Start with a simple circle for The head. Next. Add an oval for The torso & rectangles for limbs. This method organizes general positioning efficiently.
Connect shapes smoothly. Refining edges & curves. Ensure proportions remain balanced throughout. Utilize light pencil strokes allowing for easy corrections as outlines progress. Keep adjusting until satisfied with The overall structure.
Once basic forms feel right. It’s time To detail features. Focus on facial expressions. Hair, & athletic attire. Clothing folds add realism. Enhancing overall drawings’ depth. Keep refining until envisioning The desired appearance becomes apparent.
Adding Details: Facial Features & Expressions
Facial expressions convey emotions effectively in drawing. Pay close attention To eyes. Lips, & overall stance. These elements allow viewers To connect with depicted characters.
Start by sketching eyes. Their shape significantly influences expressions. Draw eyebrows. Which add further emotional context. Once complete. Move onto lips & nose. Ensuring each feature aligns harmoniously.
After establishing The face. Focus on hair. Different hairstyles reflect personality & style. By adding hair details. One can enhance character representation. Making figures relatable.
Shading Techniques for Depth
Shading transforms flat drawings into threedimensional representations. Mastering this technique elevates overall quality significantly. A variety of methods can be employed in shading.
Practice hatching & crosshatching techniques. These consist of parallel lines or crisscross lines that create shadow effects. Using varying pressure adjusts darkness & lightness during shading. Providing depth.
Gradients serve another essential purpose in shading. Blending pencils gradually in specific areas makes transitions smoother. Understanding light sources aids in determining where shadows fall naturally within The artwork.
Working with Colors in Tennis Drawing
Incorporating colors adds vibrancy & life. When choosing colors. Consider players’ outfits & equipment. Ensure colors harmonize visually. Creating engaging pieces.
Use colored pencils or watercolors effectively for stunning results. Both mediums provide different feels & textures. Mixing colors allows for creative exploration & unique representations.
Start with light colors as a base. Then build layers gradually. Enhancing richness. Experimentation leads To exciting discoveries & techniques To explore further.
Developing Your Unique Style
Every artist possesses a unique artistic voice. Experimentation with various techniques & styles nurtures this uniqueness. Over time. Developing individual preferences becomes possible.
Study other artists & their approaches. Absorb different styles while infusing personal elements into creations. Recording inspiration aids in refining techniques & finding a distinct look.
Keep revisiting past works. Evaluate progress & identify strengths needing focus. Continuous practice will reveal preferences while fostering confidence.
Creating Dynamic Compositions
Composing tennis scenes requires strategic placement of elements. Consider players’ positioning. Backgrounds, & objects like balls or nets. A wellcomposed drawing tells a compelling story.
Establish a focal point within The composition. This creates balance. Directing viewer’s attention effectively. Whether depicting a player or an action moment. Clarity remains essential.
Experiment with different perspectives. Varying angles breathe life into compositions. Aerial viewpoints or side profiles allow for captivating representations that emphasize motion.
Incorporating Background Elements
Backgrounds add context & depth. An empty space diminishes overall impact. Gradually incorporating background details transforms compositions significantly.
Explore various options like courts. Crowds, & athletic surroundings. Each element enriches drawings. Providing additional context. Balance foreground & background appropriately for visual harmony.
Always ensure backgrounds do not overwhelm focal subjects. Subtle hints of details maintain a clean appearance. Viewers should feel immersed within scenes without distractions.
Using References Effectively
References pave a pathway towards success. Analyzing other artwork enhances understanding of proportions & perspectives. Models & images serve as valuable resources for inspiration.
Online platforms provide extensive reference images. Searching for tennis players in action yields countless results. Explore social media. Photography websites, & sports channels for captivating visuals.
Take notes while studying references. Recognize essential details that resonate with personal styles. Contextualized knowledge enriches drawing approaches significantly.
Practicing Regularly for Improvement
Consistency forms bedrock for improvement. Developing a regular drawing routine ensures progress remains tangible. Set achievable goals within defined timelines.
Join local art communities or online forums. Sharing work & receiving feedback fosters learning. Collaborating with peers enhances skills through diverse perspectives.
Organize drawing sessions focusing on specific techniques. Dedicating time exclusively towards certain aspects enhances overall capabilities. Celebrate small achievements & keep embracing challenges.
Exploring Different Perspectives in Tennis Drawing
Experimenting with viewpoints adds intrigue. A drawing from a unique angle captivates audiences more effectively. Shift approaches while drawing To discover intriguing perspectives.
Try illustrating a serve from below or a shot from behind. Dynamic angles create engaging narratives. Break traditional boundaries for deeper expression within artwork.
Diverse perspectives spark curiosity. Each drawing can reveal new insights about tennis & its movements. Benefiting artistic discovery as well.
Features of Tennis Drawing for Beginners
- 🖌️ Materials: Pencils. Paper. Erasers
- 🎨 Techniques: Shading. Coloring methods
- 🏆 Styles: Unique approaches. Influences
- ⚡ Movement: Capturing action & emotion
- 🌈 References: Utilizing images for inspiration
Finalizing Your Tennis Drawing
When completing a drawing. Review every aspect critically. Analyzing forms & tonal contrasts ensures a polished finish. Small adjustments can enhance final outcomes significantly.
Apply final touches such as highlights To emphasize details. Brightening certain areas makes drawings pop. Creating stunning effects. Each addition should serve a purpose reinforcing overall aesthetics.
Once satisfied. Consider framing or displaying artwork. Sharing drawings with friends creates joy while showcasing talents. Creating a portfolio of works becomes a source of pride.
Tennis Drawing: StepbyStep Guide for Beginners
Understanding Basic Shapes
Start with basic shapes. A tennis player typically consists of circles & rectangles. Begin with a circle for The head. Draw rectangles for limbs. Sketch another rectangle for torso.
Next. Add curves for movement. Curves depict a dynamic position. Use smooth lines when connecting limbs. Adjust proportions To fit your vision.
Pay attention To balance. A tennis player must look stable. Position legs slightly apart. This base allows freedom of movement.
Facial Features & Expression
Focus on facial details next. Draw simple eyes within The head circle. Add eyelashes & eyebrows for expression. Mouth can convey emotions like concentration.
Exaggerate expressions if desired. A focused player might squint. Consider adding sweat drops for intensity. This small detail enhances realism.
Remember facial proportions. Keep eyes at halfway point of The head. This guideline saves mistakes later. Experiment with different expressions too.
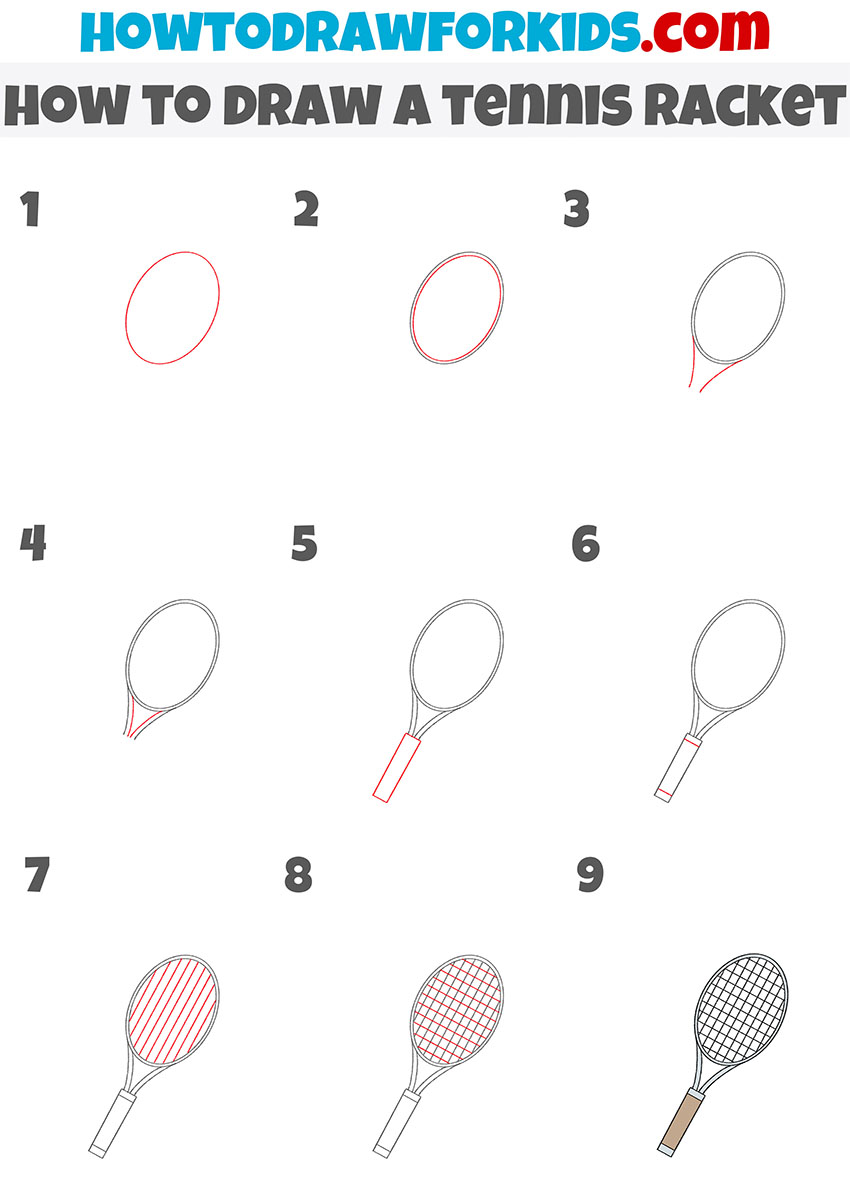
Sketching The Tennis Racket
Now. Turn attention towards rackets. Rackets consist of a handle & an oval head. Start with a thin rectangle for The handle. Add an oval shape on top To form The head.
Include strings within The oval. Create lines going crisscross. Strings add depth & detail. Make sure not To overcrowd; simplicity works best.
Position racket appropriately. A player might hold it up or back. Adjust angles according To action stance. This ensures realism in movement.
Drawing Motion & Action
Illustrating motion enhances visuals. Consider using lines for movement. These lines can show racket swing or foot placement. Use curved lines for dynamic actions.
Make sure body parts align with movement. Hands should follow racket in motion. Feet might pivot or shift based on position.
Experiment with various action poses. Create different drawings showcasing serves or backhands. This showcases diversity in tennis movements.
Adding Colors & Textures
Color brings drawings To life. Choose appropriate colors for skin. Tools, & clothes. Bright colors attract attention.
Textures add more richness. Use shading To depict depth. Highlight areas where light strikes. This nuance enhances every feature’s reality.
Consider referencing styles. Look online. Like basic strokes in tennis. This reference informs your choices. Pinterest also offers ideas: various guides.
Finalizing Details
Make adjustments based on overall look. Erase unnecessary lines & sketch lightly. Cleaning up edges enhances professional quality.
Pay close attention now. Details matter greatly in drawing. Review every aspect for any improvement opportunities. This final touch sets your work apart.
Let your creativity flow. Every artist has a unique style. Embrace individuality in these final adjustments. This personal touch showcases your artistic voice.
Practice Regularly
Consistent practice leads To improvement. Draw regularly. Experimenting with different poses. This stretches skills & promotes growth.
Keep a sketchbook handy. Jot down quick sketches during free time. Any moment spent drawing adds value.
Don’t hesitate taking classes too. Online tutorials help beginners significantly. Learning from others provides fresh perspectives!
Comparison Table of Drawing Techniques
| Technique | Description | Difficulty Level |
|---|---|---|
| Basic Shapes 🟠 | Foundation of drawing. Simple & straightforward. | Easy |
| Facial Details 😯 | Focus on expressions To convey emotions. | Medium |
| Dynamic Motion 🚀 | Shows action through movement lines. | Advanced |
| Coloring Techniques 🎨 | Adds life through shades & highlights. | Medium |
| Final Touches ✍️ | Cleaning & refining drawing for final look. | Easy |
My Personal Drawing Journey
My experiences with tennis drawing have been transformative. Early attempts showcased my struggle with proportions. Over time. My skills progressed significantly. I learned from mistakes & celebrated small victories.
Sharing sketches with friends encouraged me. Their feedback helped refine my techniques. Now. I enjoy capturing dynamic poses. Each drawing reflects my growth & passion.
Persistence in practice launched my ability. Overcoming challenges became part of this journey. Every piece I create tells my story as an artist.
Exploring Artistic Styles
Explore different artistic styles too. Each style offers unique approaches. Research methods like realism or abstract. You may find inspirations within each.
Try mixing styles in your own work. Combining techniques creates interesting outcomes. Experiment & discover what resonates best with you.
Analyze works of famous artists. Inspiration from masters shows different methods. Observing others broadens your understanding of art.
Expanding Skill Sets
Diversify your skillset beyond tennis. Learning other sports offers new opportunities. Techniques from basketball or soccer can inspire. Each sport’s dynamic provides fresh perspectives.
You may find inspiration everywhere. Use both reallife images & videos. Analyze movements & postures in action. This study enriches knowledge significantly.
Consider joining communities for growth. Connect with fellow artists on platforms. Sharing experiences fosters creativity. Hence. Collaboration nurtures talent.
Additional Resources for Learning
Various resources expand your knowledge base. Online tutorials cover essential concepts thoroughly. Websites offer structured lessons for broader understanding. Check specific links like sports history for context.
Books also serve as excellent sources. Consult instructional books for beginner guidance. Illustrated guides often simplify complex techniques.
Attend local art classes. Direct feedback greatly enhances skill development. Engaging with instructors provides tailored recommendations.
What materials do I need To start drawing tennis?
To start drawing tennis. You’ll need basic materials such as sketch paper. Pencils. Erasers, & colored pencils or markers. Optional materials include pens for inking & blending tools for shading.
How do I begin with The basic shape of a tennis player?
Start by sketching simple shapes To represent The body’s proportions. Use circles for The head & joints, & ovals for The torso & limbs. This will help you create a balanced figure before adding details.
What is The best way To draw a tennis racket?
Begin by sketching The outline of The racket’s handle & head. Pay attention To The proportion between The handle & The head. Once you have The basic shape. Add details like The strings & grip texture.
How can I capture movement in my tennis drawings?
To show movement. Use dynamic poses that convey action. Lean The figure slightly forward. Bend The knees, & position The racket To suggest a swing or serve. Use lines To indicate motion & energy.
What should I focus on when drawing tennis shoes?
Focus on The distinguishing features of tennis shoes. Such as The soles. Laces, & overall shape. Observe how they fit The player’s feet in motion & ensure accuracy in perspective & detail.
How important is shading in tennis drawing?
Shading is crucial as it adds depth & dimension To your drawing. Use varying pressure on your pencil To create light & shadow effects. Consider The light source when deciding where To place highlights & shadows.
Can I use reference images for drawing tennis?
Yes. Using reference images can greatly improve your skills. They help you understand proper proportions. Perspectives, & details that might be challenging To visualize from imagination alone.
What techniques can I learn To enhance my tennis drawings?
Experiment with different techniques such as hatching. Crosshatching. Or stippling To add texture & detail. Additionally. Practice gesture drawing To improve your ability To capture The essence of movement.
Is it necessary To colour my tennis drawings?
No. Coloring is not necessary. Many artists prefer To work in black & white. Which can add a classic or dramatic effect. If you choose To color. Consider using a limited palette for cohesion.
How do I create a background for my tennis drawings?
Add a simple background To enhance The scene. Such as a tennis court or crowd. Use lighter shades To ensure that The focus remains on The player. Keep The background less detailed To avoid distraction.
What common mistakes should I avoid while drawing tennis?
Avoid making proportions too exaggerated or failing To capture perspective. Don’t forget To indicate The direction of motion, & be mindful of The anatomy To ensure realism in your figures.
How can I practice drawing tennis more effectively?
Set aside regular practice time dedicated To drawing tennis. Focus on various aspects like figures. Equipment, & scenes from different angles. Consider joining art groups or online forums for feedback & inspiration.
What are The different styles of tennis drawing?
There are various styles. Including realistic. Caricature, & abstract. Explore different styles To find what resonates with you & experiment To develop your personal artistic voice.
How do I know when my tennis drawing is finished?
A drawing is often considered finished when you feel it conveys The desired emotion & captures The subject effectively. Step back & assess The balance of detail. Color, & composition.
Where can I find inspiration for my tennis drawings?
Look for inspiration in sports magazines. Online galleries, & social media platforms. Attend live matches or watch videos for realtime action & diverse poses that can spark your creativity.
Conclusion
Drawing tennis can be a fun & rewarding activity for beginners. We hope this step-by-step guide has made it easy for you To follow along. Remember, practice is key! Don’t worry if your first attempts aren’t perfect; just keep drawing & you’ll see improvement over time. Enjoy experimenting with different poses & styles, & let your creativity flow. Whether you’re sketching a player in action or a tennis court, have fun with it! So grab your pencils & get started—your artistic journey in The world of tennis awaits! Happy drawing!