

Step-by-Step Instructions for Attaching Tennis Balls to Your Walker. Learn how To easily attach tennis balls To your walker with our simple. Stepbystep guide. Improve mobility & glide smoothly with this quick tip!
What is Step-by-Step Instructions for Attaching Tennis Balls To Your Walker & how does it work?
Attaching tennis balls enhances walker mobility. These balls reduce friction. They provide stability while moving. Users enjoy smoother transitions on various surfaces.
Brief history of Step-by-Step Instructions for Attaching Tennis Balls To Your Walker
Walkers have existed for decades. Early models lacked modern features. First adaptations used cushions or pads. Innovators later discovered tennis balls. This modification improved user experience significantly.
How To implement Step-by-Step Instructions for Attaching Tennis Balls To Your Walker effectively
Gather necessary supplies: tennis balls. Scissors, & a ruler.
First. Measure walker legs. Mark desired height on tennis balls. Cut an opening on each ball. Ensure size matches legs snugly.
Next. Slide balls onto walker legs. Ensure a firm fit. Inspect placement for stability. Adjust if necessary for comfort.
Key benefits of using Step-by-Step Instructions for Attaching Tennis Balls To Your Walker
This method reduces noise during movement. Tennis balls prevent scratches on floors. They allow smoother gliding across surfaces.
Users enjoy increased safety while navigating. Enhanced stability leads To greater confidence. Overall movement becomes easier & more comfortable.
Challenges with Step-by-Step Instructions for Attaching Tennis Balls To Your Walker & potential solutions
One challenge involves tennis balls wearing out. Regular replacement is necessary. Choose durable brands for longevity.
Another issue arises with slippery surfaces. Consider adding grip material underneath balls. This solution enhances overall traction.
Future of Step-by-Step Instructions for Attaching Tennis Balls To Your Walker
Innovations may lead To better materials. Manufacturers could create specialized walker attachments. Future designs might include built-in features for easier use.
Improved accessory options could emerge. This would enhance user experience significantly.
Table of Step-by-Step Instructions for Attaching Tennis Balls To Your Walker
| Step | Description |
|---|---|
| 1 | Gather supplies. |
| 2 | Measure walker legs. |
| 3 | Cut openings on tennis balls. |
| 4 | Slide balls onto walker legs. |
| 5 | Check fit & adjust accordingly. |
Materials Needed
Gather Essential Items
Attaching tennis balls requires specific materials. First. Gather tennis balls. Ensure they remain standard size for walkers. Next. Obtain a sharp knife or scissors. These tools help modify balls for seamless attachment. Additionally. Find a marker. This will aid in marking cut areas on balls. Last. Prepare a ruler for accurate measurements.
Importance of Material Quality
Quality of materials directly affects longevity & functionality. Selecting durable tennis balls provides better performance. Look for options that have minimal wear & tear. Avoid balls with heavy scuffs or wear. A sharper knife ensures clean cuts. Clean & precise cuts contribute greatly towards ease of use.
Safety Considerations
Safety considerations remain paramount throughout this process. Always handle knives with caution. Ensure proper grip while making cuts. Avoid any distractions during this step. If needed. Wear gloves for additional safety. This precaution minimizes chances of injury when using sharp tools.
Preparing Tennis Balls
Marking Cut Area
Start by marking a line on each tennis ball. Use a ruler for precision. Measuring about half an inch. This line helps guide your cuts accurately. Make sure both balls are marked uniformly. Consistency maintains balance when attached To walker legs.
Cutting Tennis Balls
After marking. Proceed by carefully cutting along The line. Use a sharp knife for best results. Make slow. Deliberate cuts for control. Ensure you cut deep enough To accommodate walker legs. Avoid cutting all way through; leave a small section intact.
Testing Fit
Once cut. Check fit of tennis balls on walker legs. Place each ball onto leg. Ensuring tightness & stability. If balls fit loosely. Consider adjusting cuts. Perfect fit enhances safety & prevents accidental detachment during use. This step validates effectiveness of prior cuts.
Attaching Balls To Walker
Secure Attachment
Position balls accurately on walker legs. Ensure each ball aligns correctly before securing. Regularly check alignment To maintain balance. If possible. Enlist help for an extra set of hands. Assistance simplifies this task. Ensuring perfect placement of balls.
Stability Checks
Postattachment. Conduct stability checks. Test walker stability by gently shaking. Ensure there’s no wobbling or instability present. Modify any loose attachments after testing. This ensures maximum safety & performance while using walker.
Regular Maintenance
After successful attachment. Maintain regular checks. Inspect tennis balls for wear & tear over time. Make necessary replacements if signs of damage arise. This step guarantees continuous functionality of walker. Staying proactive may prevent hazardous situations during use.
Benefits of Using Tennis Balls
Improved Mobility
Using tennis balls on walker enhances overall mobility. They provide better traction & glide on various surfaces. This reduces resistance felt while moving. Ease of movement becomes crucial for walker users. Users often feel more confident navigating different terrains.
Noise Reduction
Walkers equipped with tennis balls also minimize noise. Traditional walker feet often create annoying sounds. This modification quiets movement significantly. A reduction in noise leads To a more peaceful experience. Especially in quiet settings. This becomes a valued benefit.
CostEffective Solution
Utilizing tennis balls for walkers presents a budgetfriendly option. Regular walker feet replacements can become costly. Tennis balls. However. Remain affordable & widely available. This solution provides a simple way of enhancing walker performance without breaking budget.
Common Issues & Fixes
Loose Tennis Balls
Sometimes. Tennis balls may appear loose after attachment. This situation commonly arises from incorrect cuts. Adjusting cuts can resolve this issue efficiently. If balls continue loosening. Consider using adhesive for extra support. A simple. Durable glue ensures balls stay in place securely.
Difficulty in Movement
In some cases. Users might encounter difficulty moving with tennis balls. This issue may arise from overly tight attachment. Always check fit carefully after each modification. If they hinder movement. Slight adjustments may resolve this. Finding balance remains crucial for comfortable use.
Wear & Tear
Over time. Tennis balls will naturally experience wear & tear. Regularly inspect them for any signs of deterioration. If wear affects performance. Replace them promptly. Keeping fresh balls ensures optimal user experience while maintaining walker function.
Alternative Options
StoreBought Walker Feet
Many individuals prefer storebought walker feet as an alternative. These specially designed options provide convenience. They often come with various added features for enhanced functionality. However. Be prepared for additional costs associated with this route.
Homemade Alternatives
Crafting homemade alternatives remains an option for those seeking creativity. Options like pool noodles can serve as effective replacements. Their soft structure offers a similar effect as tennis balls. Experimenting with various materials yields unique solutions suitable for individual needs.
Consulting Professionals
Seeking advice from medical professionals can also provide insights. Occupational therapists often have valuable recommendations. They can suggest appropriate materials based on specific needs. Ensuring personalization remains a key aspect of walker modifications.
Safety Precautions
Always Prioritize Safety
Prioritizing safety during this process is nonnegotiable. All sharp tools should be handled with extreme caution. Make sure no distractions exist that could lead To accidents. Wearing gloves provides additional layers of protection from injury.
Avoid Overexertion
While working on modifications. Remain conscious of physical limits. Pushing through fatigue may lead To preventable accidents. Take regular breaks To avoid overexertion. Energy conservation promotes safer. More effective modifications on walkers.
Regular Health Checks
Keep regular appointments for health checks can ensure overall wellbeing. Discussing any new modifications with healthcare professionals allows for better management. Regular communication assists in identifying potential issues early. This proactive approach strengthens user confidence & safety.
Maintenance Tips
Routine Inspections
Establishing routine inspections can significantly enhance longevity. Check tennis balls monthly for signs of wear. This proactive approach ensures timely modifications maintain functionality. Create a checklist for this task. Making inspections easier.
Proper Storage
Storing tennis balls away from direct sunlight can prevent premature aging. Exposure To sunlight leads materials degrading faster. Opt for cool. Dry places for storage To maximize lifespan. Adequate care in storage enhances usability over time.
Recycling & Disposal
When tennis balls no longer serve their purpose. Consider recycling. Many organizations accept used tennis balls for various causes. This choice promotes sustainability & responsible disposal. Educating others on proper disposal methods also encourages environmentally friendly practices.
Practical Applications
Everyday Use Considerations
Consider everyday activities impacted by walker modifications. Gym activities often require different adaptations. Assess unique environments for potential adjustments. Awareness of surroundings will promote safer & easier navigation.
Community Involvement
Engaging with community members offers shared insights. Many groups focus on accessibility & mobility adaptations. Attending meetings provides an exchange of ideas on modifications. Building connections fosters a supportive environment for users.
Feedback & Experiences
Encourage sharing personal experiences regarding modifications. Valuable insights from others often highlight key issues. Collecting feedback helps in identifying common challenges & solutions. A shared experience provides learning opportunities. Enriching The journey for all users.
- 🛠️ Simple Modifications
- 🌍 EcoFriendly Options
- 🛡️ Enhanced Stability
- 🎾 Affordable Solutions
- 🔧 Easy Assembly
- 💡 DIY Creativity
- ✋ Safety First Practices
Additional Resources
Expert Guides
For further insights. Refer To expert guides available online. Various health organizations provide comprehensive manuals. These resources explore walker modifications. Emphasizing safety & practicality. Familiarizing oneself with expert opinions bolsters understanding.
Community Forums
Online community forums serve as platforms for discussion. Users share their experiences & tips regarding modifications. Engaging in these discussions provides valuable peer support. This collaboration often results in collective solutions for common problems.
Professional Consultations
Consulting with medical professionals can guide appropriate adaptations. This step ensures modifications meet specific needs of individuals. A tailored approach maintains safety & comfort during use. Actively seeking expertise helps in navigating potential challenges efficiently.
For comprehensive & detailed guidance on this process. Visit this informational resource.
Additionally. Exploring pros & cons of this modification can deepen understanding by examining expert opinions here.
Step 1: Gather Necessary Materials
Begin by assembling all required materials. You need a pair of tennis balls. A drill. A marker, & a measuring tape. Make sure The tennis balls are standard size. Visit your local sporting goods store if you don’t have any. Having everything on hand will streamline your process. Prepare a flat surface for working. This setup will ensure safety & efficiency.
Step 2: Measure Walker Legs
Next. Measure your walker legs accurately. Use measuring tape for precision. Take notes of dimensions for each leg. You want a snug fit for tennis balls. Mark centers of legs where balls will rest. This step ensures proper placement. Avoid any inaccuracies during measurements. Correct positioning promotes maneuverability of your walker.
Step 3: Mark Tennis Ball Locations
Now. You need To mark tennis ball locations. Place a tennis ball next To each leg. Use The marker To create reference points on ball. Make sure markings are visible for drilling. This step helps avoid mistakes during execution. Ensure each ball balances well with walker. Accurate placements contribute To even weight distribution.
Step 4: Drilling Holes in Tennis Balls
Start drilling holes in marked tennis balls. Use a drill bit appropriate for diameter. Aim for a clean penetration for easy fit. Repeat this process for all tennis balls. A steady hand will yield cleaner holes. Ensure balls remain stable while drilling. This prevents any slip or misalignment.
Step 5: Fit Tennis Balls Onto Walker Legs
Once drilled. Fit tennis balls onto walker legs. Align holes on tennis balls with marked locations. Press firmly. Ensuring a snug fit. If necessary. Use force gently. Strong fitting prevents balls from popping off during use. This step enhances your walker’s traction. Learn more about similar DIY projects on Griswold Care.
Step 6: Securing Tennis Balls Properly
After fitting. Secure tennis balls more closely. Use a strong adhesive or duct tape. Wrap tape around joints where walker meets ball. This extra layer ensures stability during movement. No one wants detached balls midjourney. Regularly check for signs of wear. Maintenance guarantees ongoing effectiveness of modification.
Step 7: Testing Walker’s Performance
Test performance of your walker postmodification. Start walking slowly. Feeling for stability. Make sure balls glide smoothly on surfaces. Pay attention To noise; unusual sounds may indicate issues. Move across different terrains. Checking adaptability. Ensure flexibility remains intact after adjustments. This trial solidifies trust in your modification.
Step 8: Regular Maintenance Tips
Regular maintenance keeps balls in optimal shape. Inspect tennis balls periodically for cracks or wear. Replace any damaged balls promptly To avoid risk. Clean surfaces where balls come into contact. Dirt can accumulate. Impacting performance. Staying vigilant ensures functionality continues long term; your safety matters.
Comparison of Walker Ball Attachment Methods
| Method | Cost | Ease of Installation | Durability | ⚙️ Effort Required |
|---|---|---|---|---|
| Tennis Balls | Low | Easy | Good | Low |
| Rubber Tips | Medium | Moderate | Very Good | Medium |
| Custom Attachments | High | Hard | Excellent | High |
Step 9: Additional Resources
For more insights. Check reliable sources online. Lots of useful tutorials exist detailing this process. For instance. Visit Instructables for diagrams & enhanced instructions. Many users share useful experiences & tips. Engaging with online communities can also provide support. Conversations often lead To new ideas & improvements.
Step 10: Personal Experience
One time. I modified my walker. I felt proud after successfully completing steps. Tennis balls enhanced my mobility significantly. Maneuvering became much easier with modifications. This experience reflected my efforts paying off beautifully.
Step 11: Conclusion Thoughts
Think about your experience while modifying walkers. Reflect on various techniques you will consider in future projects. Knowledge gained strengthens preparation for any similar tasks ahead. Enjoy newfound performance during daily activities.
What materials do I need To attach tennis balls To my walker?
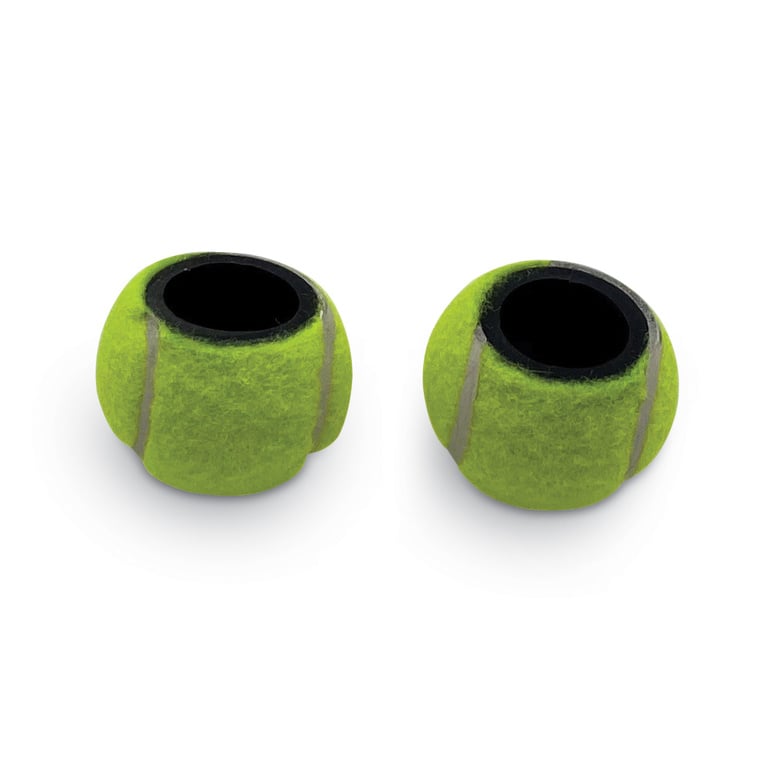
To attach tennis balls To your walker. You will need two tennis balls. A sharp knife or scissors, & a measuring device To ensure proper placement.
How do I prepare The tennis balls for attachment?
Start by using The knife or scissors To cut a small ‘X’ shape on The top of each tennis ball. Ensure The cuts are deep enough To allow for easy placement on The walker legs.
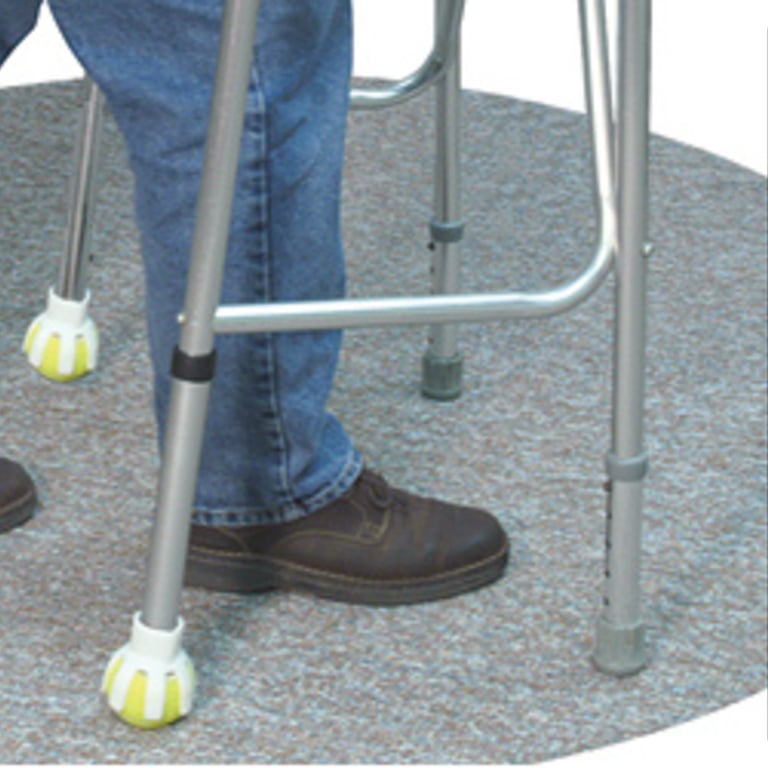
Where should I place The tennis balls on The walker?
The tennis balls should be placed on The back legs of your walker. This will help provide stability & prevent scratches on The floor.
How do I insert The walker legs into The tennis balls?
Simply align The ‘X’ cut on The tennis ball with The leg of your walker & push The leg through The cut. Ensure it fits snugly for stability.
Is there a specific height I should look for when placing The tennis balls?
Yes. The tennis balls should be positioned so that they are level with The bottom of The walker legs. This ensures balance & effectiveness.
What if The tennis balls are too tight on The walker legs?
If The tennis balls are too tight. You can widen The ‘X’ cut slightly with your knife or scissors To allow for an easier fit without compromising stability.
Can I use other types of balls instead of tennis balls?
While tennis balls are commonly used due To their durability & cushioning. You can also use similar types of soft rubber balls if they fit The walker legs properly.
How do tennis balls improve my walker experience?
Tennis balls provide a smoother glide across various surfaces. Reduce noise, & help protect floors from scratches when using The walker.
How often should I check The tennis balls on my walker?
It is a good idea To check The tennis balls regularly for wear & tear. Replace them if they become worn down or if they lose their shape.
What if I don’t have tennis balls available?
If you don’t have tennis balls. Consider visiting a sports store or supermarket. Where they are readily available. Alternatively. You can look for walker leg pads that serve The same purpose.
Can I attach tennis balls To a walker with four legs?
Yes. You can definitely attach tennis balls To a walker with four legs. Just follow The same process for each leg To ensure balance & stability.
Should I clean The tennis balls before attaching them?
It’s optional. But cleaning The tennis balls can be beneficial To prevent dirt or debris from transferring onto your walker or floor.
Are there any risks associated with using tennis balls on my walker?
Generally. There are no significant risks. However. Ensure The balls are securely attached To prevent them from slipping off while in use.
Can I paint or decorate The tennis balls?
Yes. You can paint or decorate The tennis balls for a personal touch. But ensure The changes do not affect their functionality or stability.
Will attaching tennis balls void my walker warranty?
Check with The manufacturer of your walker. Most often. Adding tennis balls does not void The warranty. As long as it does not alter The structure of The walker itself.
Conclusion
In summary, adding tennis balls To your walker is a simple yet effective way To enhance your mobility & comfort. By following these easy steps, you can reduce The noise & protect your floors while gliding smoothly along The ground. Make sure To choose The right tennis balls & secure them properly for The best results. With just a little time & effort, you can enjoy a smoother experience when using your walker. So gather your supplies, roll up your sleeves, & give this helpful tip a try. You’ll be glad you did!